People use their smartphones while driving, whether it’s for getting directions, making phone calls, or for sending and receiving messages. Is it inconvenient to use a phone while driving? Yes. Is it unsafe to use a phone while driving? Definitely.
Enter Apple CarPlay — a technology that enables integrating an iPhone with a car’s infotainment system in order to do all this in an easier, safer way. There is a similar technology called Android Auto for Android devices — you can read more about developing apps for Android Auto here.
In this blog post, you will learn what it takes to add CarPlay support to an iOS app. Along the way, we will discuss the CarPlay technology, how it works under the hood, and some insights as to how developing for CarPlay is different than regular iOS development.
Excited? Let’s get started!
What is Apple CarPlay?
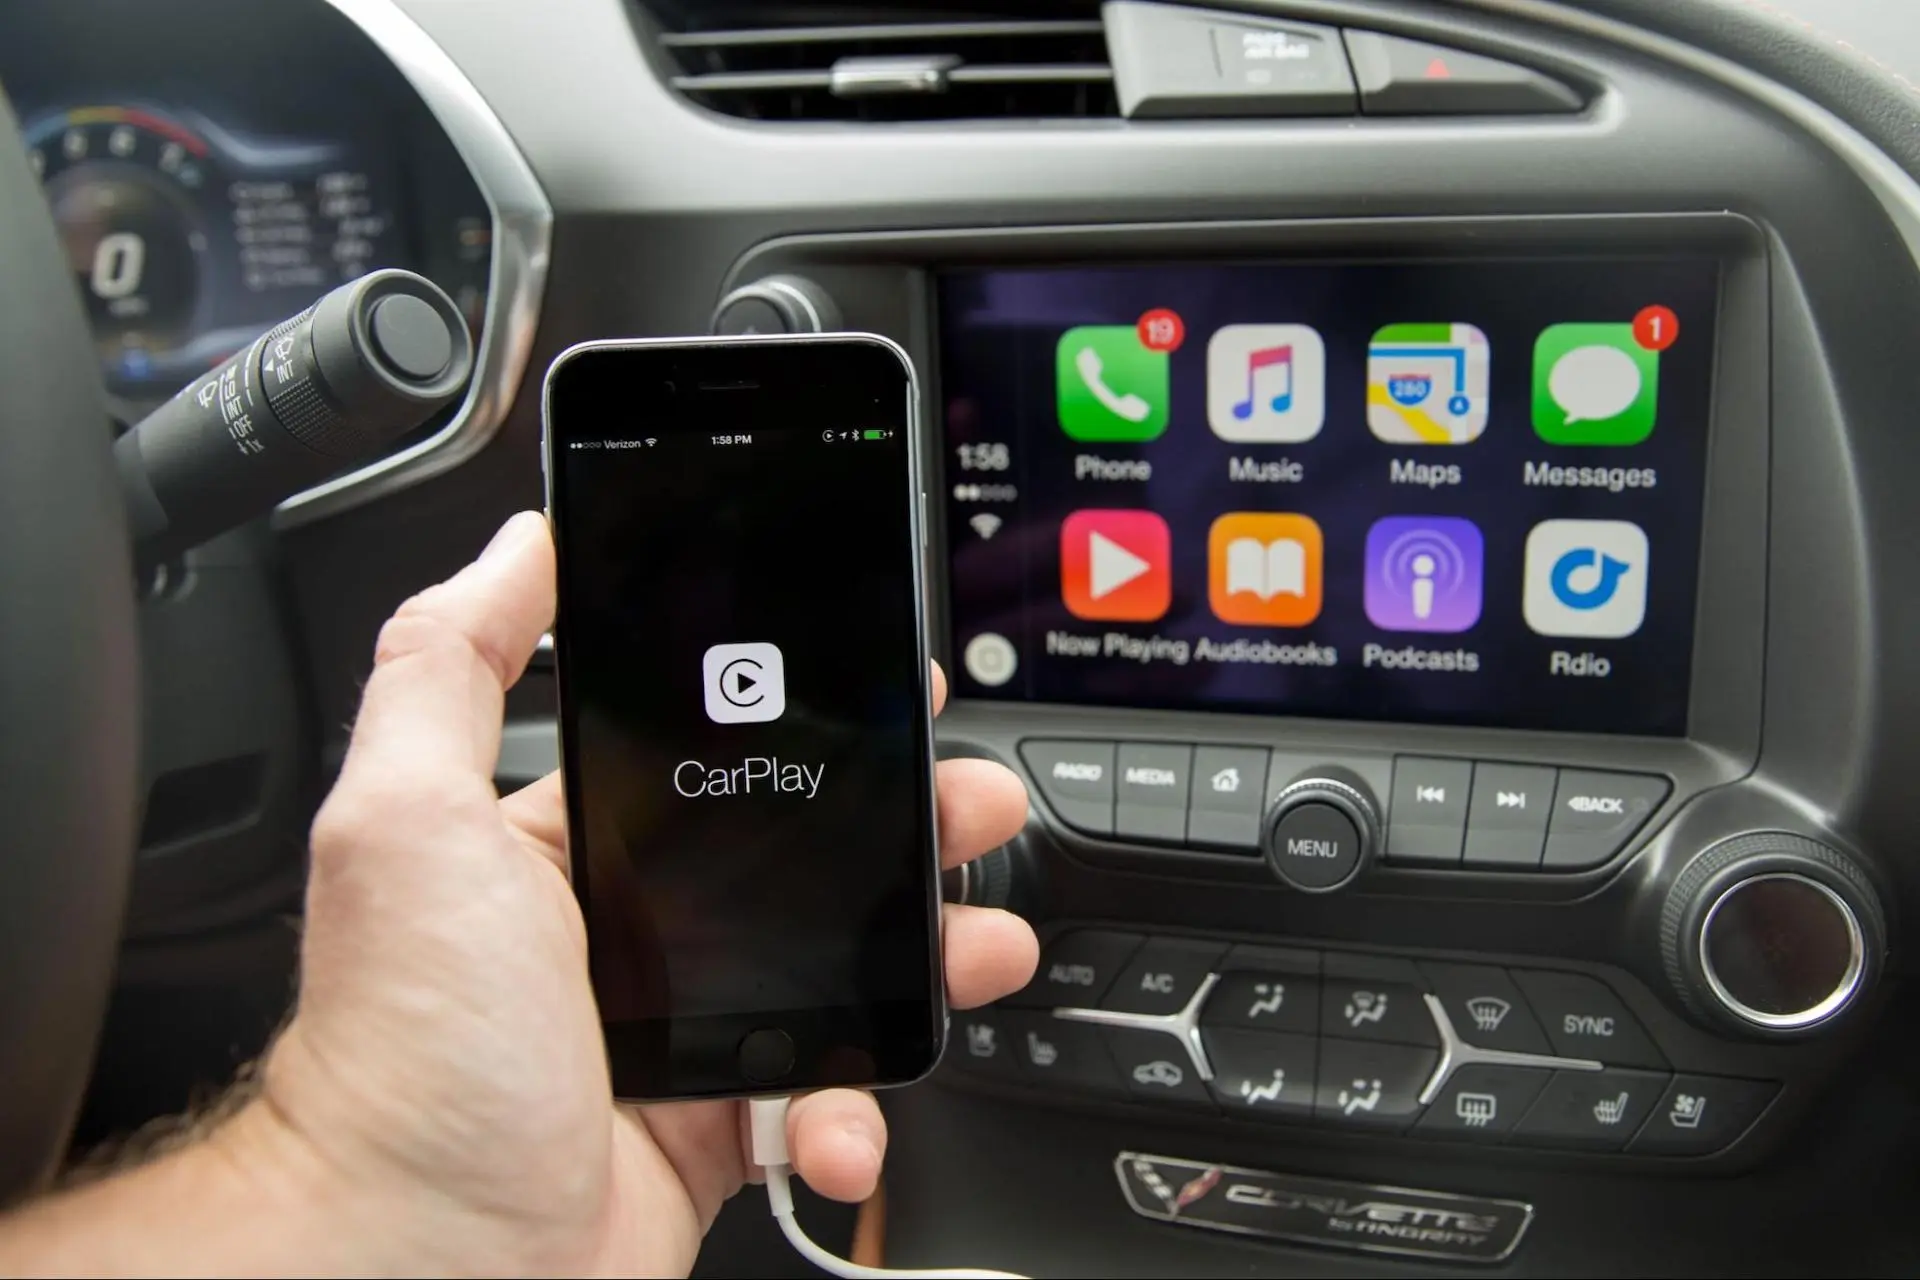
CarPlay is a smartphone mirroring system that allows a car to use an iPhone’s features through its infotainment screen. You can use CarPlay to get directions, make calls, send and receive messages and enjoy your favorite music — all while keeping your eyes on the road and your hands on the wheel. Basically, CarPlay is a smart, safe, convenient, and seamless way to use your iPhone and its features while driving.
To use CarPlay, you need an iPhone 5 or newer, running at least iOS 7.1, and a car that supports CarPlay. You can connect an iPhone to the car’s head unit either through the car’s USB port or wirelessly using Wi-Fi.
A “CarPlay app” is not a standalone app, but instead is an extension to an iPhone app that makes it compatible with CarPlay.
Categories of CarPlay apps
Unlike regular mobile iOS apps, CarPlay apps have a predefined set of rules and guidelines that are expected to be followed in order to maintain a distraction-free driving experience. One such restriction is on the types of apps which can be developed for CarPlay.
CarPlay currently supports 7 categories of apps. Let’s understand each of these categories below:
- Navigation: Supports showing turn-by-turn directions, real-time traffic data, and detailed maps with 3D landmarks — all with Siri integration. Examples of apps: Apple Maps, Google Maps, and Waze.
- Music and Radio: Supports showing screens that follow UI templates like “Recently Played”, “Search”, “Library”, and “Now Playing”. Siri integration is also supported. Examples of apps: Apple Music, Spotify, and YouTube Music.
- News and Entertainment: Apps like Audible and Overcast that provide access to audiobooks, podcasts, and news broadcasts.
- Utility: Apps like Parkopedia and PlugShare that provide useful information like parking availability and locations of electric vehicle charging stations.
- Communication: Apps like WhatsApp, which provide support to send and receive phone calls and messages using Siri integration.
- Driving Tasks: Apps that enable drivers to perform simple tasks that help with the drive, or that need to be done during the drive. These can be tasks like controlling car accessories, or starting/ending a cab ride.
- Quick Food Ordering: Apps that allow drivers to place drive-oriented food orders (e.g. drive-thru) from quick service restaurants.
Similar to mobile applications, CarPlay apps also support a variety of features for different app categories: Multi-screen apps, alerts and notifications, voice assistance, car hardware access (to be released soon), etc.
How Does CarPlay Work Under the Hood?
CarPlay works by connecting the 2 key hardware components: an iPhone and a Car’s Head Unit (this is the infotainment display panel with touch input). The iPhone acts as a Controller and the car’s head unit acts as an Accessory. It enables users to access the iPhone’s apps and features seamlessly from the car screen. Let’s understand how these components work together to show a simplified iOS-like UI on the car’s built-in display.
As displayed in the diagram below, there are 3 sub-systems which make a complete car head unit (CarPlay sub-system, Native sub-system, Hardware and system resources).
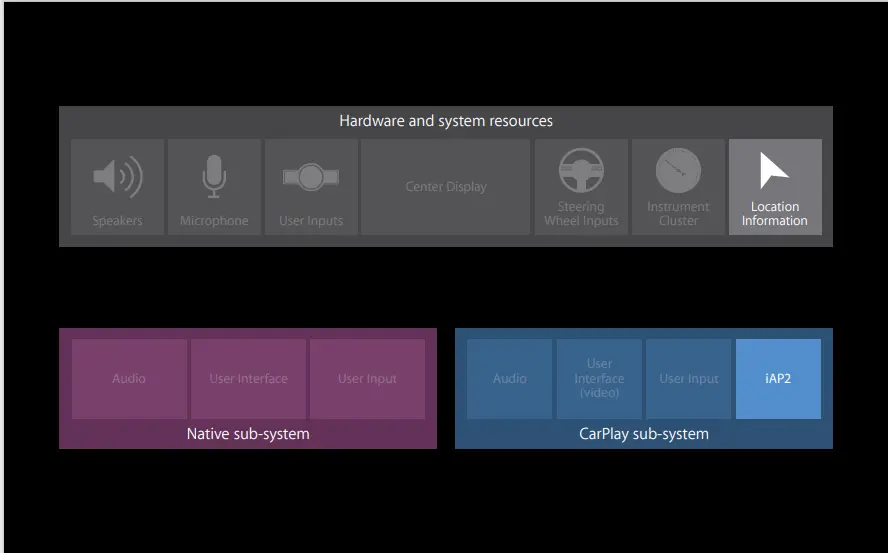
- CarPlay sub-system: Manages communication between the iPhone and the car’s head unit. Handles transmission of audio, video, user input, etc.
- Native sub-system: Car OS and UI, along with apps for making calls, navigation, or playing music.
- Hardware and system resources: Microphone, speakers, display, and user input elements like control knobs, buttons etc.
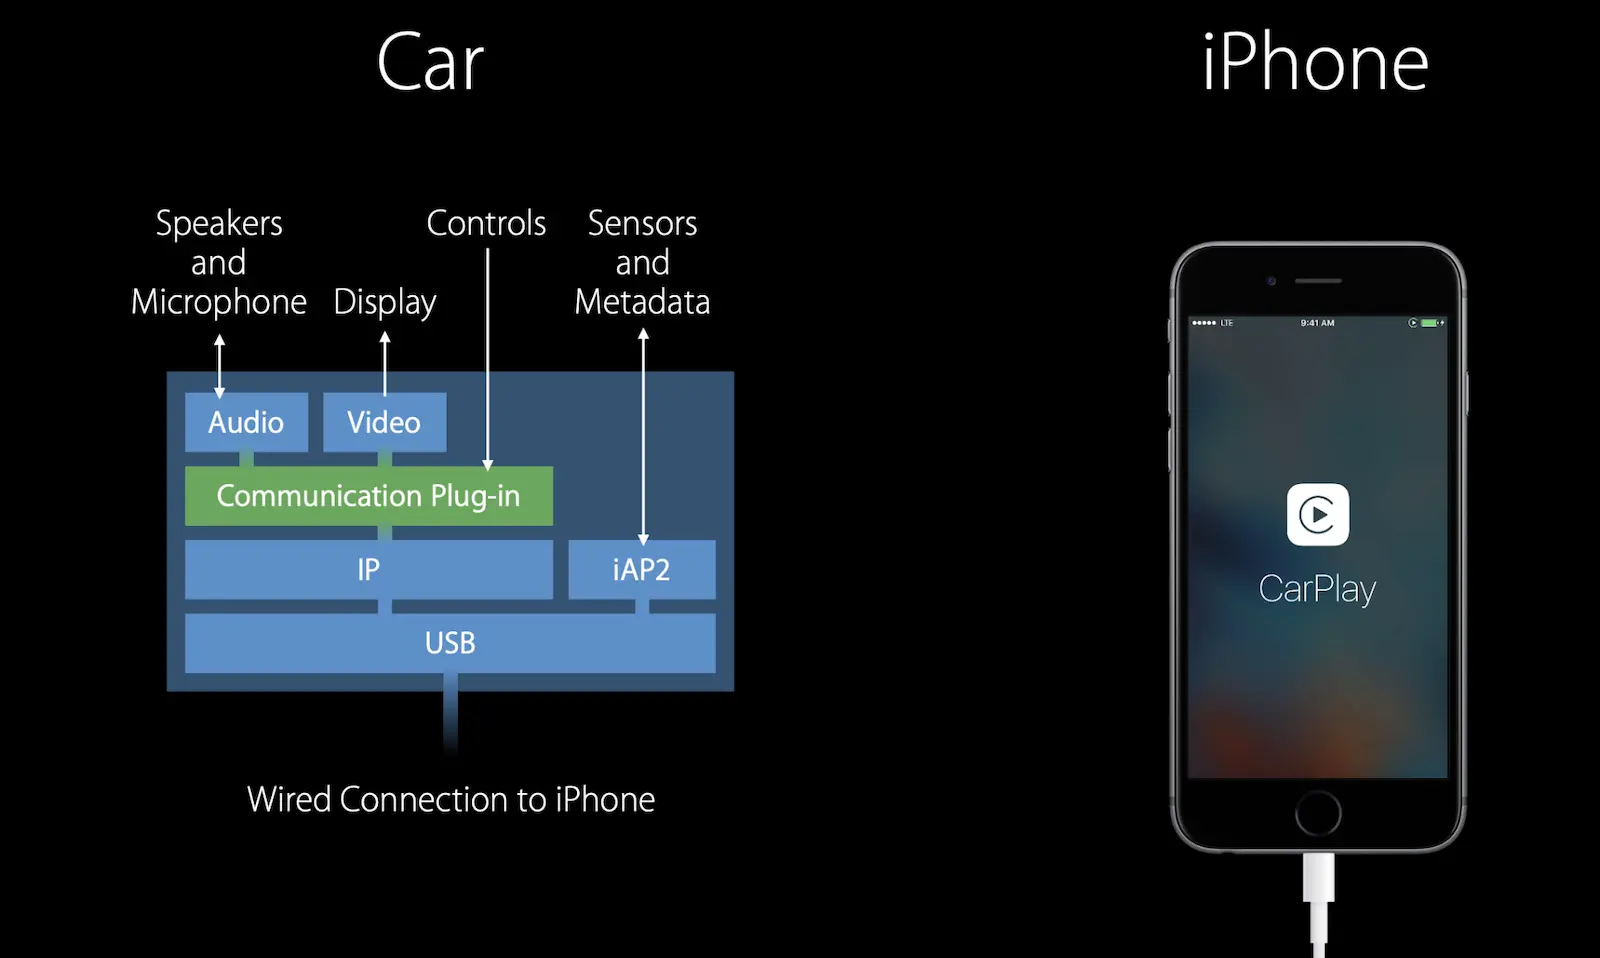
The CarPlay sub-system handles everything related to CarPlay apps on the car’s head unit. As shown in the diagram below, there are 2 communication protocols used — IP (Internet Protocol) and iAP2 (iPod Accessory Protocol 2), through which communication between iPhone and the car’s head unit takes place.
Communication Protocols
- Wired connection (via USB): It uses a combination of the IP and iAP2 protocols to exchange data. The system shares Audio, Video and Controls data streams through the IP protocol via the “Communication Plug-In”, while Sensors and Metadata are shared via the iAP2 protocol.
- Wireless communication (via Wi-Fi and Bluetooth): It only makes use of the IP protocol to exchange data streams, like Audio, Video, Controls, Sensors, and Metadata via the “Communication Plug-In”.
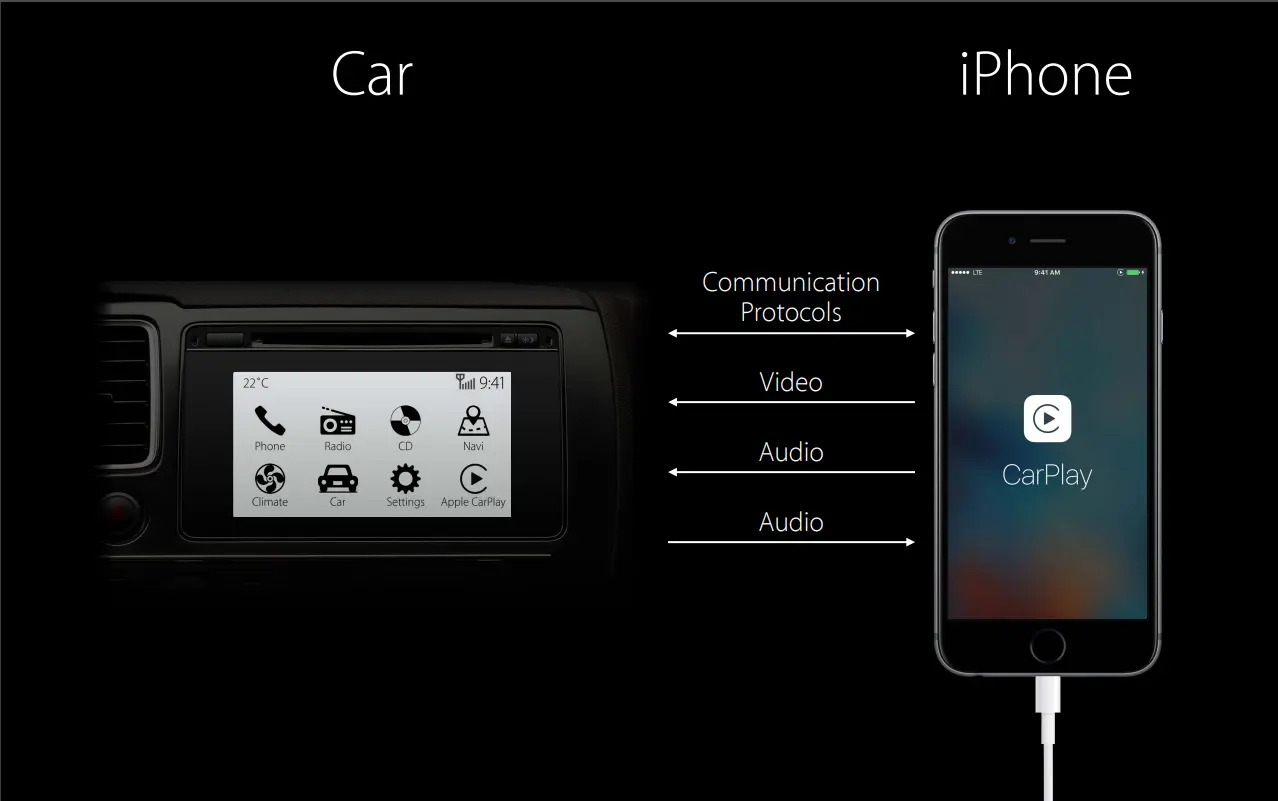
Communication Channels
Data is exchanged between the iPhone and the Car Head Unit over 3 channels.
- Audio and Video channels: Audio and video are streamed to the car system connected with speakers, microphone, and display. The H264 video format is used to send video from the iPhone to the car. A thing to note: video streaming happens in one direction from iPhone to car, while audio streaming can be bidirectional.
- Control channel: This channel helps to stream different types of data from Car to iPhone. This includes control events (from touch screen, knob, touchpad, or buttons) as well as sensors and metadata (such as audio, telephony, GPS, wheel speed, etc).
All the data processing required to show UI / play audio on the car’s head unit happens on the iPhone, and only the audio and video streams (wrapped in Internet Protocol — IP) are transmitted to the head unit. None of the iPhone’s data is directly shared or stored on the car’s head unit. All the communication happens through the channels explained above, making sure that data privacy and security is maintained.
Let’s take a look at an example that will help you understand the end-to-end working of CarPlay apps. For example, let’s say a user wants to play a song using the Spotify app.
1. Linking the iPhone to the car’s infotainment system (via USB / wirelessly)
Once the iPhone is connected to the car’s head unit, it uses multiple channels to become active:
- The first step is setup (authentication and identification) and location sharing between the host and accessory using the iAP2 protocol.
- Once established, the Car session becomes active, h264 video displaying the home screen is sent from iPhone to Car via the Video channel.
2. Clicking on the Spotify app icon on the car screen
Once the Spotify app is clicked on the head unit:
- A touch event (including X and Y coordinates) from the car’s CarPlay sub-system is shared with the iPhone’s CarPlay system app through the Control channel.
- On receiving the coordinates, the iPhone’s CarPlay will start the Spotify app in a foreground process, which will generate a CarPlay app UI with help of its CarPlay app module.
- This UI is then streamed back to the car’s head unit through the Video channel.
- The foregrounding of the Spotify app can be confirmed with the help of the console logs retrieved from iPhone.
Logs showing that the Spotify foreground process is started on the iPhone:
// Spotify is launched as response to the Spotify icon being tapped on CarPlay
runningboardd    Assertion 31-628-627651

  (target:[application<com.spotify.client>:2438]) will be created as active

// CarPlay session is connected after spotify is launched
CarPlayTemplateUIHost    connected session  <private>

// CarPlayTemplateUIHost will launch spotify in foreground
CarPlayTemplateUIHost  [application<com.spotify.client>:2438]

  Workspace  assertion state did change: ForegroundFocal

  (acquireAssertion = YES).
Note: Even though Spotify is in the foreground process, the Spotify app does not have to be visibly running on the iPhone.
3. Selecting a song and playing music
When the user selects a song to play on the car’s head unit — 3 different channels are used to show updated UI and play the audio:
- Control channel: This channel is used to share the touch event (and X, Y coordinates) generated when the track to be played is selected.
- Video channel: This channel gets an updated stream to show the “Now Playing” UI once a song starts playing.
- Audio channel: This channel is used to stream the song which is being played to the car.
To summarize, Apple CarPlay acts as an interface which enables communication between the car’s head unit and an iPhone. All the data is processed on the iPhone and is streamed over to the car’s head unit. Any input controls or details about the car are sent back to the iPhone for processing. This on-device processing ensures a safe, secure, and user-friendly experience while also leveraging the latest capabilities of iPhones.
Development and Testing of CarPlay Apps
Code editor: Xcode
Testing tools:
- Built-in iOS simulator
- CarPlay simulator (with additional features)
- CarPlay supported head unit — can be bought from the market to perform real world testing
Almost all the features can be tested using available simulators. Developers would not really need a real car to test the feature during development. For features which need testing on real devices, an aftermarket third-party CarPlay compatible head unit can be used.
Simple CarPlay App Demo
As mentioned briefly earlier, the term “CarPlay app” represents a set of additional files added to an iOS mobile project to enable it for the car’s head unit. A CarPlay app does not work independently. It should have an associated mobile app installed on the iPhone. In terms of release, only a single mobile binary is built with required support to execute on the car’s head unit.
To understand exactly what additional support is added, let’s check out the demo below.
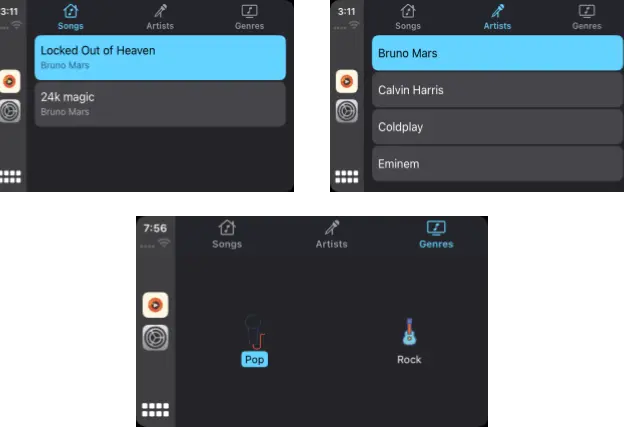
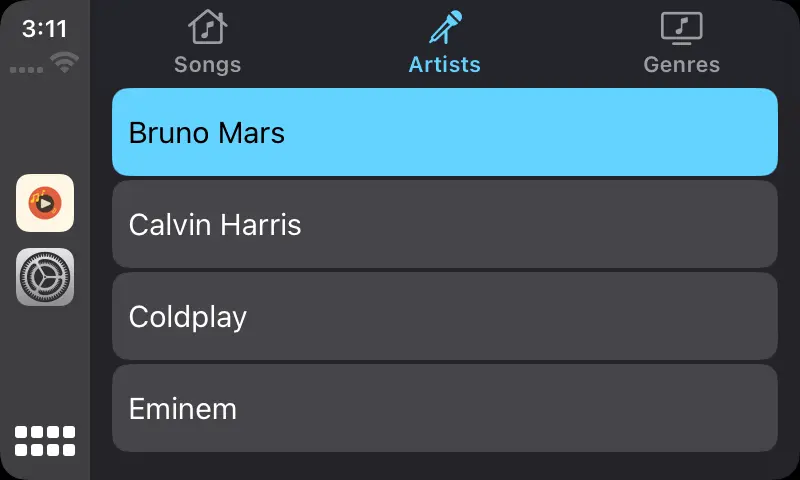
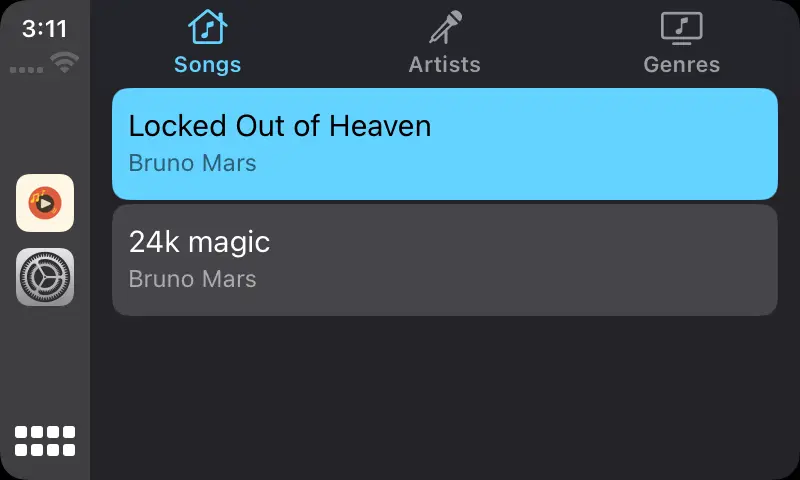
In this demo, we will build a UI for the home screen of a Music playing app with 3 tabs: “Songs” (displays a list of songs), “Artists” (displays a list of artists), and “Genres” (displays a list of genres).
Here is a link to a GitHub project containing this demo which you can refer to get started.
1. Setting Up the Development Environment
Ensure that the app belongs to a supported app category for Apple CarPlay. Since we’re developing an audio player app, we will need to use CarPlay Audio App Category (Key: com.apple.developer.carplay-audio)
We will need to request a CarPlay entitlement from Apple and create a Provisioning Profile to be able to build a binary for iPhone.
Until the entitlement is received from Apple, we can still develop and run the CarPlay app using the Xcode simulator. For that, follow the steps mentioned below:
- Go to project’s target → Signing & Capabilities → + Capability and add any capability e.g. Siri.
- This will generate an entitlement file with the project name e.g.
Demo-CarPlayMusic.entitlements. - Open this file as source code and replace the contents with the following source code:
<!-- Source code of Info.plist for adding the CarPlay scene -->

<?xml version="1.0" encoding="UTF-8"?>
<!DOCTYPE plist PUBLIC "-//Apple//DTD PLIST 1.0//EN" "http://www.apple.com/DTDs/PropertyList-1.0.dtd">
<plist version="1.0">
  <dict>
    <key>application-identifier</key>
    <string>$(AppIdentifierPrefix)$(CFBundleIdentifier)</string>
    <key>com.apple.developer.carplay-audio</key>
    <true/>
  </dict>
</plist>
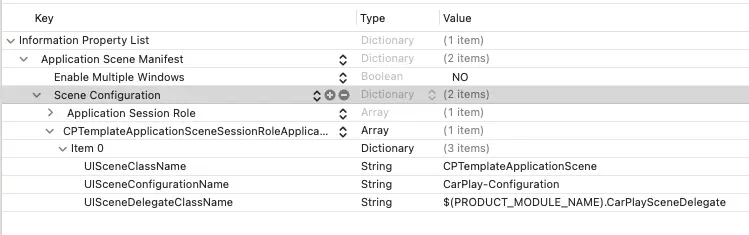
This will remove the Siri entitlement and add the CarPlay entitlement. The property list will look like this:

Update Info.plist to register the CarPlay scene delegate Class name.
<!-- Source code of Info.plist for adding the CarPlay scene. -->

<!-- CarPlay scene -->
<key>CPTemplateApplicationSceneSessionRoleApplication</key>
<array>
  <dict>
    <key>UISceneClassName</key>
    <string>CPTemplateApplicationScene</string>
    <key>UISceneConfigurationName</key>
    <string>CarPlay-Configuration</string>
    <key>UISceneDelegateClassName</key>
    <string>$(PRODUCT_MODULE_NAME).CarPlaySceneDelegate</string>
  </dict>
</array>
2. Implementing CPTemplateApplicationSceneDelegate
- The scene delegate of the CarPlay app i.e. a class conforming to
CPTemplateApplicationSceneDelegateprotocol is the CarPlay app’s entry point. - It has methods that give callbacks when the CarPlay screen is connected and disconnected.
- The
-templateApplicationScene(_, didConnect:)method is the entry point when the app is launched from CarPlay. - Use our implementation of
CPTemplateApplicationSceneDelegateto create a template manager classCarPlayTemplateManager, where we would create and set our root template when CarPlay launches the app and connects its scene.
// Implementation of CPTemplateApplicationSceneDelegate which is the entry point of CarPlay scene.

class CarPlaySceneDelegate: UIResponder,
                            CPTemplateApplicationSceneDelegate {
    var carPlayTemplateManager: CarPlayTemplateManager?

    // CarPlay connected
    func templateApplicationScene(
        _ templateApplicationScene: CPTemplateApplicationScene,
        didConnect interfaceController: CPInterfaceController
    ) {
        carPlayTemplateManager = CarPlayTemplateManager()
        carPlayTemplateManager?.connect(interfaceController)
    }

    // CarPlay disconnected
    func templateApplicationScene(
        _ templateApplicationScene: CPTemplateApplicationScene,
        didDisconnectInterfaceController
        interfaceController: CPInterfaceController
    ) {
        carPlayTemplateManager?.disconnect()
        carPlayTemplateManager = nil
    }
}
3. Setting up the Root Template
- For setting up the root controller, we need to set up the
CPInterfaceControllerobject. CPInterfaceControlleris the manager of navigation hierarchy and is like a Navigation controller of iPhone apps, as it can be used to push/present our templates.- CarPlay creates an interface controller for us and passes it into the
-templateApplicationScene(_, didConnect:)method. - After receiving the interface controller, we need to store it and set its root template using the
setRootTemplate(_:animated:completion:)method.
// Store the interface controller and set its root template as Tab bar template.

public func connect(_ interfaceController: CPInterfaceController) {
    self.interfaceController = interfaceController
    interfaceController.setRootTemplate(
        self.rootTemplate(),
        animated: true,
        completion: nil)
}

private func rootTemplate() -> CPTemplate {
    let tabBarTemplate = CPTabBarTemplate(templates: self.tabBars())
    self.tabBarTemplate = tabBarTemplate
    return tabBarTemplate
}
4. Creating a Tab Bar Template
CPTabBarTemplateis the template user for creating tab bars.- It organizes the app into sections, with tabs at the top of the screen.
CPTabBarTemplatecan be created from an array of other templates.- Each tab of the tab bar template corresponds to the template currently visible.
// Create a tab bar template with 3 sections: Songs, Artists and Genres.

// Generate an array of CPTemplate objects for different Tabs.
private func tabBars() -> [CPTemplate] {
    return [
        self.songsListTemplate(),
        self.artistsListTemplate(),
        self.genresGridTemplate(),
    ]
}
5. Creating a List Template
CPListTemplatecan be used to create a list of items, grouped into sections.- We can call the
-init(title:sections)method to create a list template by providing a list ofCPListSectionobjects. - Each section contains an array of list items that conform to
CPListTemplateItemorCPSelectableListItem.
// Create a list template for Songs. We can similarly create a list template
// for Artists.

// Generates a CPListTemplate for displaying a list of songs.
// Populates the list with song titles and artist names. Sets
// the handler for each song list item to print the selected
// song's title when a song is tapped.
private func songsListTemplate() -> CPListTemplate {
    var listItems = [CPListItem]()

    // Use default list of songs data and create a list
    // of CPListItems from the default songs.
    var defaultListItems: [CPListItem] = []
    for song in MusicStructureHelpers.defaultSongs() {
        defaultListItems.append(
            CPListItem(
                text: song.title,
                detailText: song.artist.name
            )
        )
    }
    listItems.append(contentsOf: defaultListItems)

    // Set a handler to handle selection.
    for listItem in listItems {
        listItem.handler = { item, completion in
            print("\(String(describing: item.text)) - selected.")
        }
    }

    // Create a CPListSection using the list items array
    // created above.
    let listSection = CPListSection(items: listItems)

    // Create the list template and set the tab image icon.
    let songsListTemplate = CPListTemplate(
        title: "Songs",
        sections: [ listSection ]
    )
    songsListTemplate.tabImage = UIImage(
        systemName: "music.house"
    )

    return songsListTemplate
}
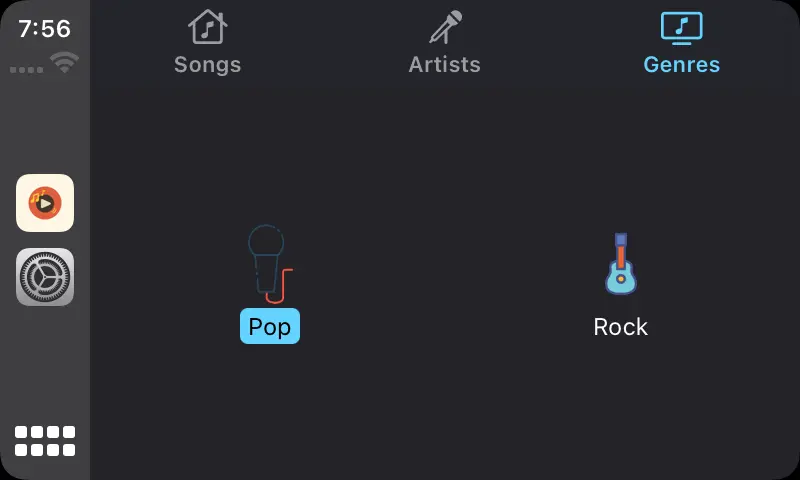
6. Creating a Grid Template
CPGridTemplateis used to display a grid of items as buttons by usingCPGridButtonobjects.- We can provide titles, images, and handlers for each button.
- We can create a grid template by calling the
-init(title:gridButton:)method and passing in an array ofCPGridButtonobjects.
// Create a grid template for displaying the grid of music genres.

// Creates a CPGridTemplate for displaying a grid of genres. Two
// CPGridButton objects are created for different genres, each having a
// title, image, and the handler
private func genresGridTemplate() -> CPGridTemplate {
    // Set up a handler, which will be used for every grid button.
    let handler: (CPGridButton) -> Void = { (button) in
        print(
            """
            \(String(describing: button.titleVariants.first))
            grid button tapped.
            """
        )
    }

    // Create grid buttons for each genre, providing title,
    // image and handler.
    let popGridItem = CPGridButton(
        titleVariants: ["Pop"],
        image:  imageLiteral(resourceName: "Pop_Genre"),
        handler: handler
    )
    let rockGridItem = CPGridButton(
        titleVariants: ["Rock"],
        image:  imageLiteral(resourceName: "Rock_Genre"),
        handler: handler
    )

    // Create the grid template using the grid buttons
    // created and set the tab image for the template.
    let genresGridTemplate = CPGridTemplate(
        title: "Genres",
        gridButtons: [
            popGridItem,
            rockGridItem,
        ]
    )
    genresGridTemplate.tabImage = UIImage(
        systemName: "tv.music.note"
    )

    return genresGridTemplate
}
CarPlay UI Guidelines
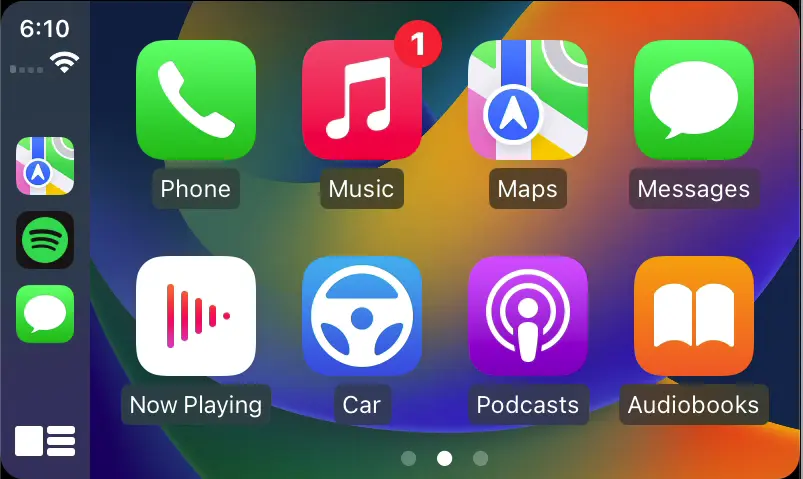
Apple CarPlay’s UI is designed to be simple and intuitive, with a layout that is similar to that of an iPhone. The home screen displays the app icons in a grid, allowing easy access. You can interact with the CarPlay using Siri voice control or the car infotainment system’s built-in controls like a touch screen, knobs, buttons, etc. This allows you to use your iPhone while focusing on driving.
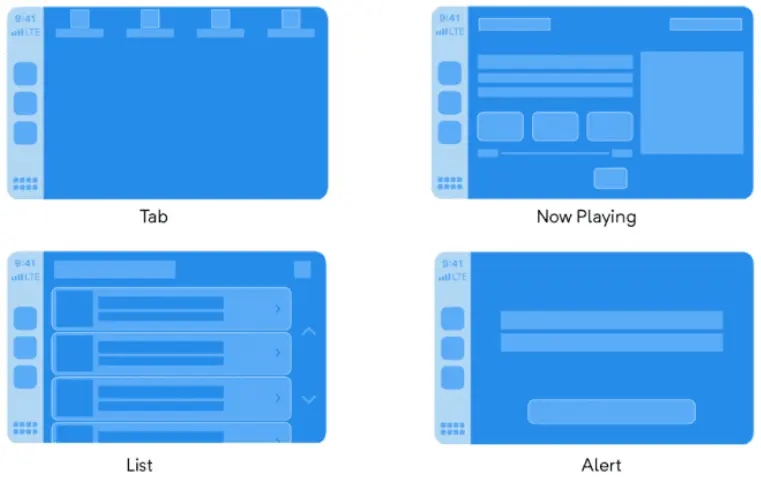
To make sure CarPlay apps are easy to use, safe, and optimized for driving, Apple has provided a set of predefined UI templates which CarPlay apps must use to define the app UI. The interface is rendered by iOS on the CarPlay, so developers do not need to adjust their layouts for different screen resolutions or manage input from different types of hardware. Some examples of these templates are added below:
Here are some restrictions while using Templates:
- Apple limits the number of templates (depth of hierarchy) and the type of templates we can use within a single app.
- Most apps are limited to a depth of 5 templates, which means that a maximum of 5 templates can be pushed onto one navigation stack.
- The number of items on the screen is limited to minimize distractions for the driver.
- The tab bar only allows up to 4 tabs in audio apps (e.g. Spotify only has 4 tabs) and up to 5 tabs for all other app types, although this may change in the future.
A CarPlay app should be designed to enable drivers to use it without losing focus on driving. A few important factors to consider:
- Enable the driver to perform tasks quickly.
- Create a minimal number of interactions to complete a function.
- Avoid adding features which require using the iPhone.
- Apps should function even when the iPhone is locked or inaccessible.
Wrapping Up
Apple CarPlay enables iPhone users to control their apps using a car’s infotainment system when they are driving in an easier, safer way. We hope this article gets you started on your CarPlay app development journey.
Happy learning!