Most recent cars allow users to connect their smartphones and use the car’s infotainment system (or head unit) as a display and touch screen — this allows users to focus on their driving while having access to apps to display directions, play music or receive calls.
Android Auto is the underlying technology that enables seamless interaction between your Android smartphone and your car’s infotainment system. Apple provides a similar technology called CarPlay for iOS devices — you can read more about developing apps for Apple CarPlay here.
In this blog post, you will learn about the inner workings of Android Auto, and learn how to add this support to an Android app.
Note: Google has another technology called Android Automotive OS — that is separate from Android Auto. We discuss this briefly later in this article.
What is Android Auto?
Android Auto is a smartphone mirroring system that allows a car to use an Android device’s apps and features through its infotainment system (a.k.a the head unit). Android Auto enables you to use your Android device while driving to get directions, make phone calls, send and receive messages, and listen to your favorite music — safely and seamlessly.
To use Android Auto, you need an Android device running Android OS version 6.0 (API level 23) or above and a car that supports Android Auto. Android Auto is preinstalled on devices running Android 10 or above. If you have Android 9 or below, you need to install the Android Auto app. Once this is done, you can connect a phone to the car’s head unit through the car’s USB port or wirelessly using Wi-Fi.
Android Auto supports a variety of features like multi-screen apps, notifications, voice assistance, car hardware data access, etc.
An “Android Auto app” is not a standalone app. Rather, it is an extension to an Android app that makes it compatible with Android Auto.
Categories of Android Auto Apps
To maintain a safe and distraction-free driving experience, Android Auto supports only a few categories of apps — currently, just 5. Let’s understand each of these categories below:
- Media: Apps for browsing and playing music — songs, podcasts, audiobooks, etc. Examples: Spotify, Youtube Music, and Audible.
- Navigation: Apps that help with getting directions. Examples: Google Maps and Waze.
- Messaging: Apps like WhatsApp and Google Chat which support sending and receiving phone calls and messages. There is minimal UI support here. Users can read messages using text-to-speech and send replies via voice input to the car.
- Point of Interest (POI): Apps for performing location-based tasks like finding charging stations, restaurants, hotels, tourist attractions, etc.
- Internet of Things (IOT): Apps for controlling IoT devices to perform actions like opening garage doors, turning on/off home appliances.
How Does Android Auto Work Under the Hood?
Android Auto works as a bridge between an Android device and a car’s head unit (the infotainment display panel with touch input). The car’s head unit acts as the host, and the Android device acts as a USB accessory. This transforms the car’s display into a hub through which Android Auto apps can be accessed seamlessly.
Android Auto Protocol
The communication between Android devices and the car’s head unit happens using the Android Auto Protocol. This protocol is built on top of the Android Open Accessory (AOA) protocol and is designed to be transport agnostic, so that it can also be used for wireless communication. Google provides a C++ library for car systems, which enables support for Android Auto Protocol. This library is available for different car platforms like Linux, Android, and Blackberry’s QNX. Most car manufacturers have OSes built on these platforms. For instance, the QNX system is used by BMW’s iDrive and Audi’s MMI.
The connection between the Android device and the car’s head unit can happen via USB (wired) or Wi-Fi (wireless). The Android Auto Protocol is used for both wired and wireless connections.
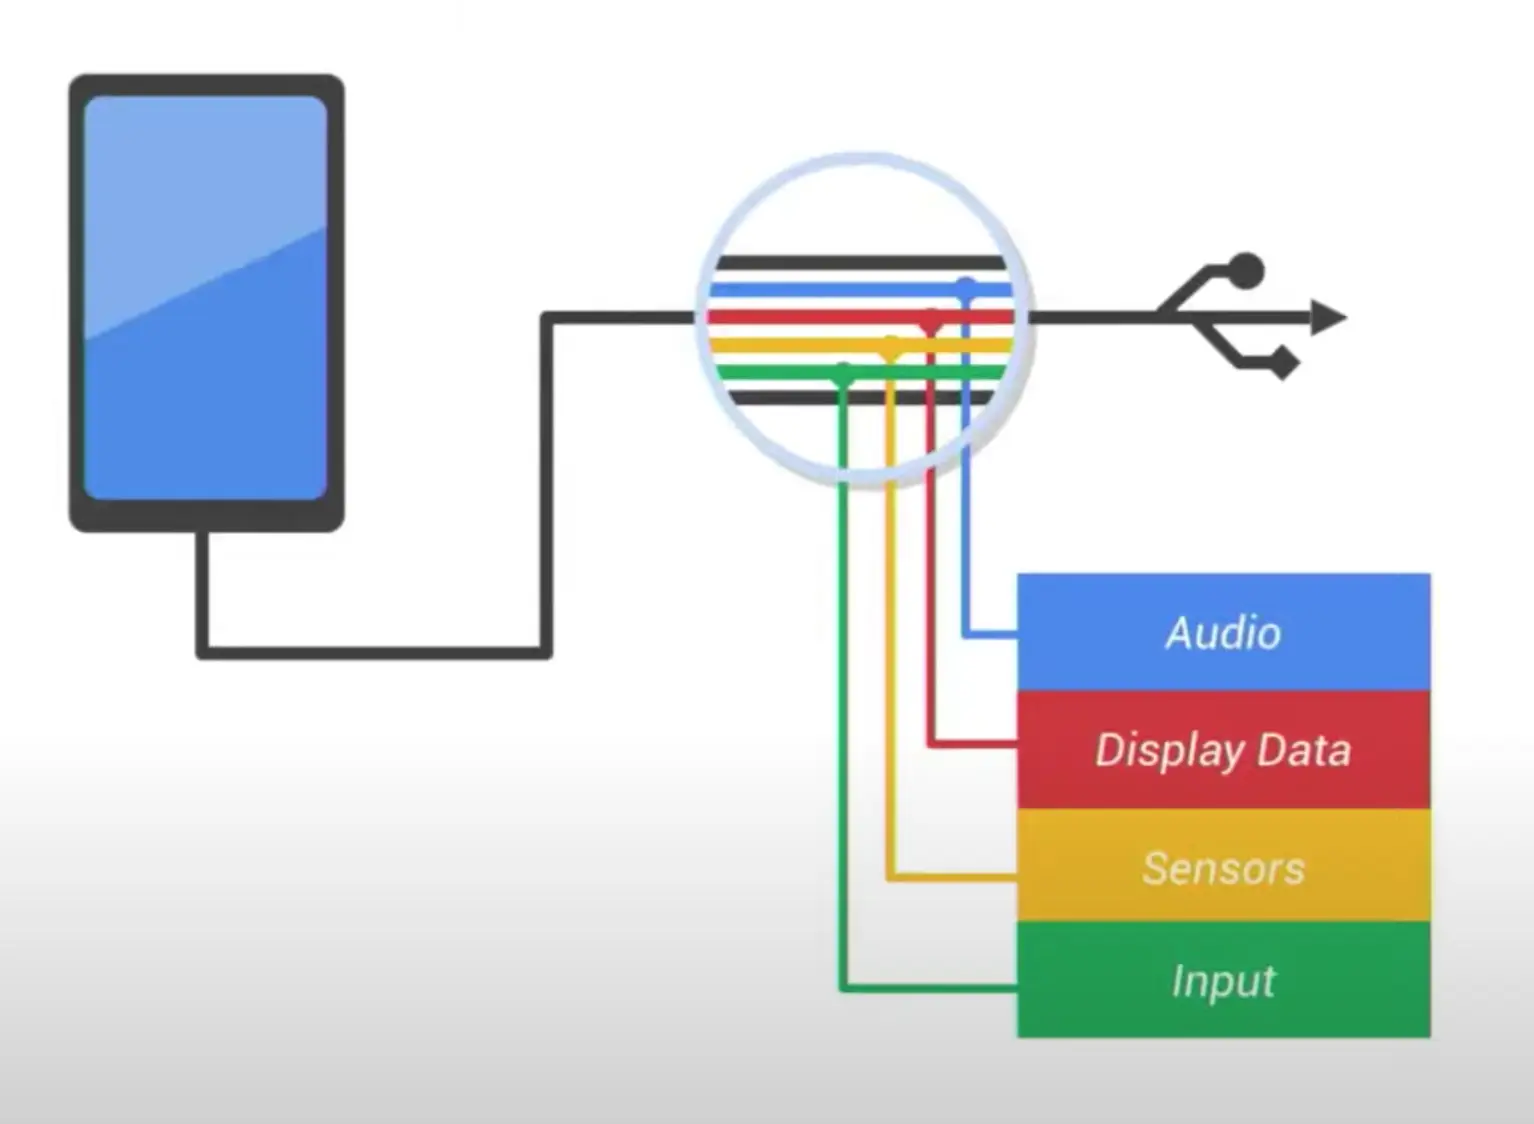
The Android Auto Protocol uses 4 communication channels to exchange data between an Android device and the car’s head unit. It uses Protocol Buffers to format the data to be shared between systems. The system streams audio, video, input events, and car sensor data through different channels. These channels multiplex together through a USB connection, which helps to prioritize them to improve the user experience.
- Audio: This channel helps with the exchange of audio content between the Android device and the head unit. It supports bidirectional communication to provide features such as hands-free calling and Google Assistant integration.
- Display: This channel streams visual interface content to the car’s head unit from the connected Android device. This channel supports only unidirectional communication i.e., from the Android device to the head unit.
- Input: This channel streams control events from the car’s touch screen, knobs, or buttons to the Android device.
- Sensor: This channel sends different sensor and metadata information about the car to the Android device. This includes things like GPS data, speed, acceleration, etc.
All the data processing required to show UI or play audio on the car’s head unit happens on the Android device. The audio and video streams are transmitted to the head unit from the Android device. None of the Android device’s data is directly shared or stored on the car’s head unit. All the communication happens through the data channels explained above, making sure that data privacy and security are maintained. This also makes it easier to take advantage of the latest Android technologies without relying on software updates for the car’s head unit, which are less frequent.
Let’s look at an example that will help you understand the end-to-end working of Android Auto apps. For example, let’s say a user wants to play a song using a Spotify-like media app.
1. Linking the Android device to the car’s head unit (via USB / Wirelessly)
Once the Android device is connected to the car’s head unit, it uses multiple channels to become active:
- The first step is setup (authentication and identification) between the host and accessory using the Android Auto protocol.
- Once established, the Car session becomes active, and a video displaying the home screen is sent from the Android device to Car via the Display channel.
2. Click on the media app icon from the car screen
Once the app icon on the head unit is tapped:
- A touch event (including X and Y coordinates) from the car’s head unit is shared with the Android Auto app on the Android device through the Input channel.
- Based on the coordinates, the Android Auto app will start the app process, which will generate a car app UI with the help of its car app module.
- This UI is then streamed back to the car head unit through the Display channel.
- The start of the app process can be confirmed with the help of adb command
adb shell ps
Logs: (showing that the app process has started on the Android device)
Connected Android device processes:
USER     PID    PPID  VSZ      RSS     WCHAN  ADDR  S  NAME
u0_a286  32094  1202  6709676  119048  0      0     S  com.example.android.uamp.next
Note: Even though the app process has started, it does not have to be visibly running on the Android device.
3. Selecting a song and playing music
When the user selects a song to play on the head unit, 3 channels are used to show the updated UI and stream audio.
- When the track to be played is selected, the touch event (and X, Y coordinates) are sent from the car’s head unit to the Android Auto App on the Android device through the Input channel.
- The song download and processing happens on the car app module on the Android device.
- The updated UI is streamed back to the car head unit through the Display channel, which will show the “Now Playing” UI.
- The Audio channel will be used to stream the audio for the song that is being played in the car.
To summarize, Android Auto acts as an interface which enables communication between the car’s head unit and an Android device. Communication between the car’s head unit and the Android device happens over the Android Auto Protocol. All the data is processed on the Android device and is streamed over to the car’s head unit. Any input controls or any details about the car are sent back to the phone for processing. This on-device processing ensures a safe, secure, and user-friendly experience while also leveraging the latest capabilities of Android devices.
Development and Testing of Android Auto compatible apps
As mentioned earlier, an “Android Auto app” is not a standalone app. Rather, Android Auto compatibility is added to existing apps to enable them to run on the car’s head unit. An Android Auto app does not work independently. There should be an existing app installed on the Android device — to which we can add Android Auto compatibility. In terms of release, only a single mobile binary is built with the required support to work with the car’s head unit.
Code editor: Android Studio
Testing tool: DHU (Desktop head unit) emulator which can be installed with steps from the official developer site.
Almost all the features can be tested using the available DHU emulator and developers don’t need a real Car to test features during development. For features that need testing on real devices, an aftermarket third-party Android Auto compatible head unit can be used.
Building Blocks of Android Auto Development
Following are the key building blocks for Car app development:
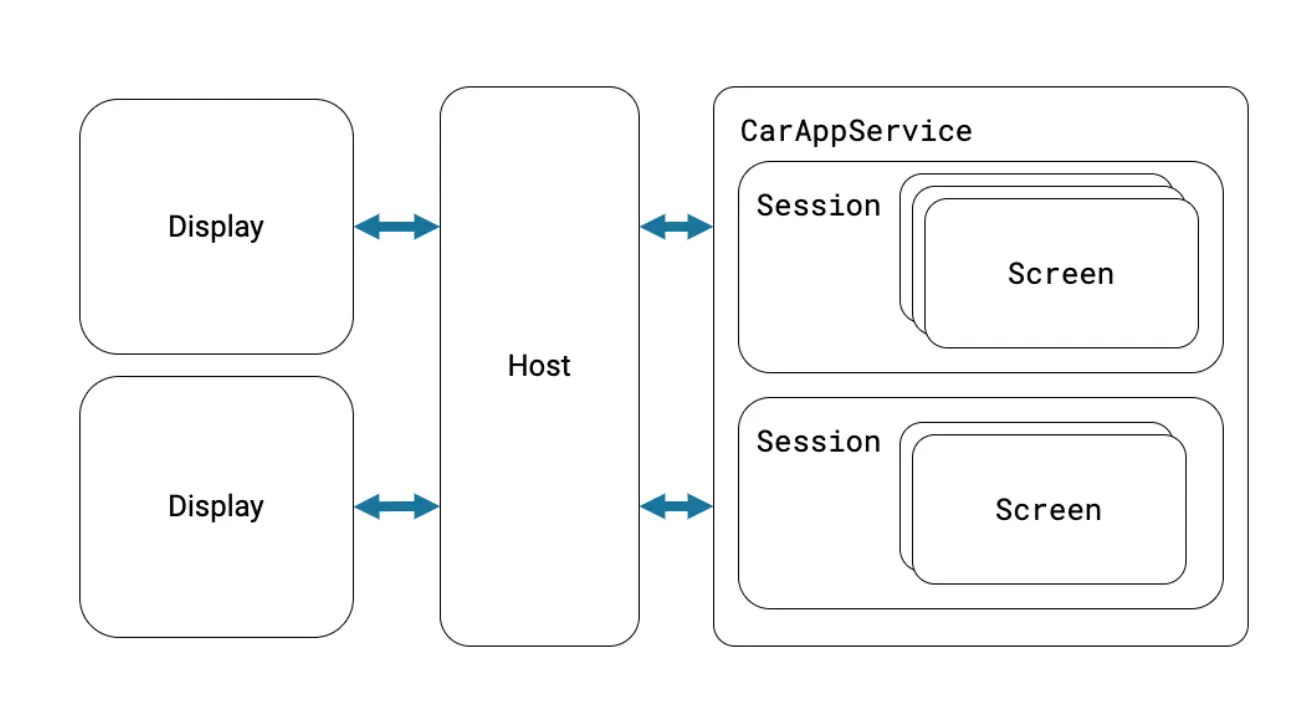
- CarAppService: The
CarAppServiceis a standard AndroidServicecustomized for the Car environment. It makes sure that your app is recognized and managed by a car application host i.e. Android Auto. It validates the host connection and provides an instance of the current session. - Session: The session serves as an entry point to display information on the car screen. The session has a lifecycle that represents the current state of your app on the car screen.
- Screen: The screen is used to manage the UI shown to the user. Like Android’s
Activity/Fragmentcomponents,Screenalso has a lifecycle. It provides a template that will be displayed when the screen becomes visible to the user. - Templates: The templates are used to define the visual appearance of screens. A few examples of templates are
PlaceListMapTemplate,MessageTemplate, andTabTemplate.
Note that some of these building blocks are not required to build specific app categories, like media or messaging apps, due to their distinct functionalities.
Simple Android Auto App Demo
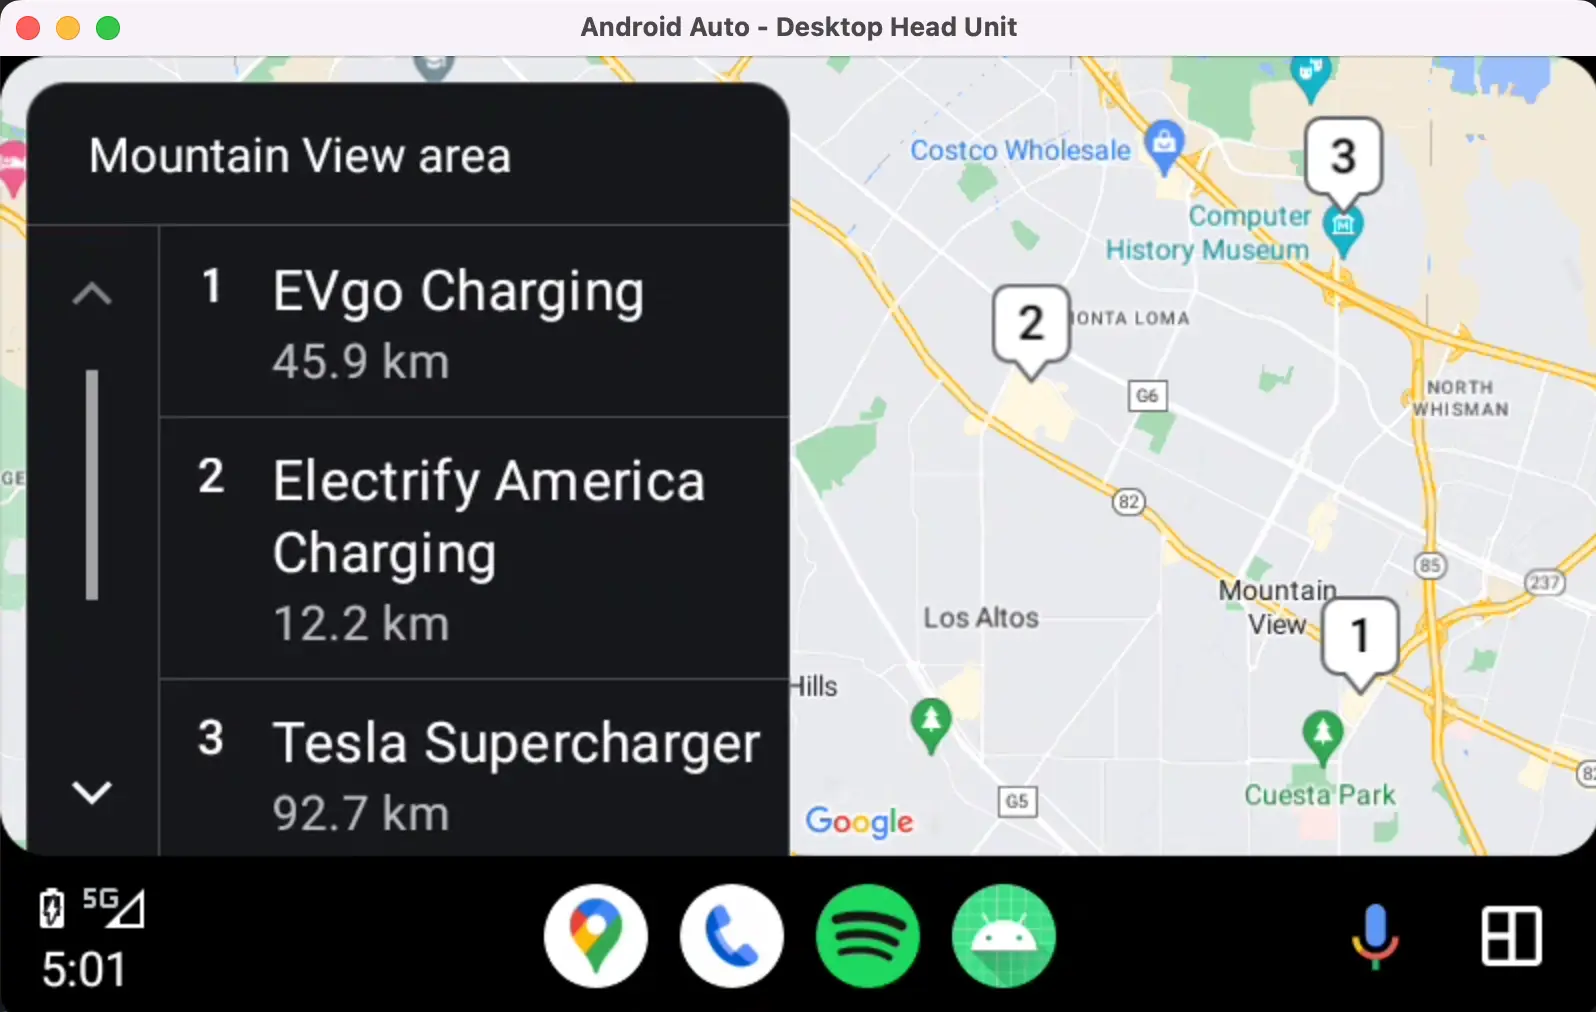
In this demo, we will build a basic POI (Point of Interest) category app showing charging stations in the Mountain View area. The demo will have a map screen, a list of charging stations, and map markers for these stations.
Here is a link to a GitHub project containing this demo which you can refer to get started.
Android Auto apps are an extension of mobile Android apps and hence all files related to car app development can be added within the same package as the Android app. However, to organize better, car app files can be grouped in different folders.
Let's see how to add this support step by step:
1. Add Gradle dependency
The androidx.car.app:app dependency is required to be added in the project level build.gradle file. This will enable the usage of the Car App library and all core classes required for building Android Auto compatible apps.
dependencies {
  ...
  implementation "androidx.car.app:app:1.3.0-rc01"
  ...
}
2. Create a CarAppService
- Create a new class that extends the library’s
CarAppServiceclass. - The service will provide an instance of
Sessionfrom theonCreateSessioncall. - The
CarAppServiceprovidesHostValidatorto verify if the host can be trusted. Otherwise, the service will not get bound with the host. For this example, we are allowing all hosts.
class PlacesCarAppService : CarAppService() {
  override fun createHostValidator(): HostValidator {
    return HostValidator.ALLOW_ALL_HOSTS_VALIDATOR
  }

  override fun onCreateSession(): Session {
    return PlacesSession()
  }
}
3. Declare service in Android manifest
- Declare
PlacesCarAppServicedefined in the above step and specify the POI app category using the intent filtercategorytag. - Add metadata to specify the minimum API version in the manifest similar to Android apps. This API level is used to specify the minimum Car API level required by your Android Auto app.
- Add metadata with
com.google.android.gms.car.applicationname to specify that the app supports Android Auto. The linkedautomotive_app_desc.xmlresource file helps in defining the template capability for the Car app.
In the Android manifest:
<manifest xmlns:android="http://schemas.android.com/apk/res/android">
  ...
  <application>
    <meta-data
      android:name="androidx.car.app.minCarApiLevel"
      android:value="1" />
    <meta-data
      android:name="com.google.android.gms.car.application"
      android:resource="@xml/automotive_app_desc" />
    <service
      android:name="com.example.places.carappservice.PlacesCarAppService"
      android:exported="true">
      <intent-filter>
        <action android:name="androidx.car.app.CarAppService" />
        <category android:name="androidx.car.app.category.POI" />
      </intent-filter>
    </service>
  </application>
</manifest>
In the automotive_app_desc.xml:
<automotiveApp>
  <uses name="template"/>
</automotiveApp>
4. Create Session class
- Create a new Session class which will extend the library’s
Sessionclass. - Use
onCreateScreenmethod to return aScreenobject. - In our example we created
MainScreen. Here, different screens can be returned conditionally as per the requirements.
class PlacesSession : Session() {
  override fun onCreateScreen(intent: Intent): Screen {
    return MainScreen(carContext)
  }
}
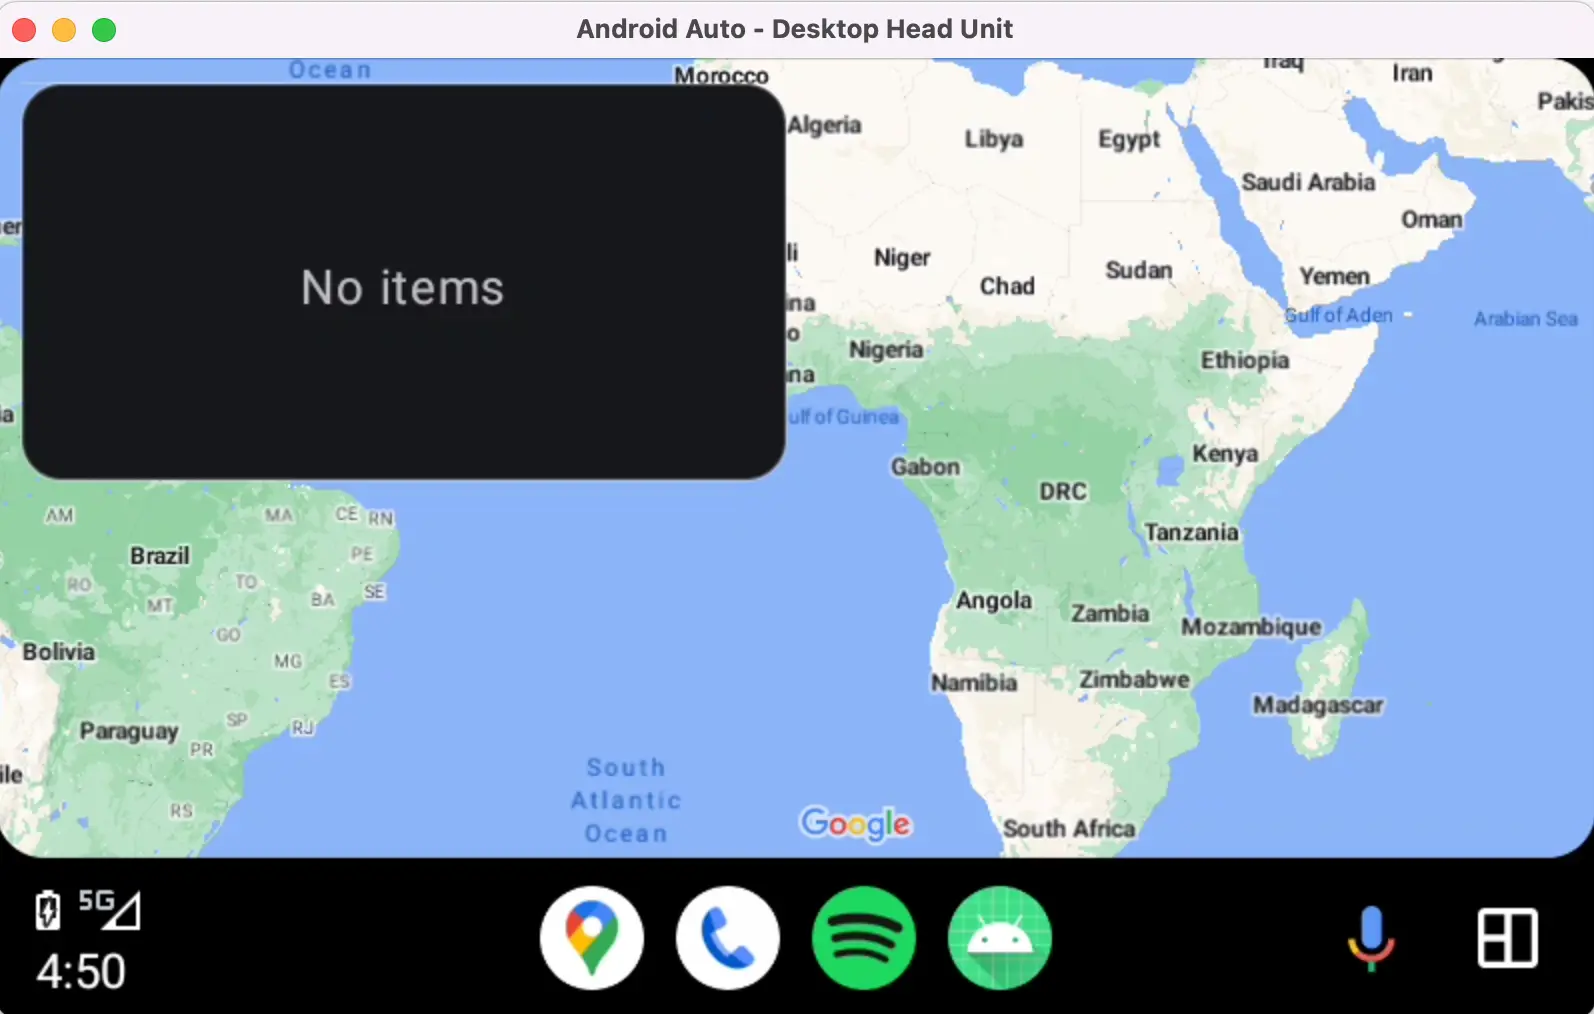
5. Create Screen with the template
- To show the charging stations list and location markers on the map we make use of
PlacesListMapTemplate. - To use the
PlacesListMapTemplatewe need to request permission forMAP_TEMPLATESin AndroidManifest.
<uses-permission android:name="androidx.car.app.MAP_TEMPLATES" />
- Create a new
MainScreenthat extends the library’sScreenclass. - Use
onGetTemplateto returnPlaceListMapTemplatewhich will show map UI on the screen.
class MainScreen(carContext: CarContext) : Screen(carContext) {
  override fun onGetTemplate(): Template =
    PlaceListMapTemplate.Builder()
      .setItemList(ItemList.Builder().build())
      .build()
}
6. Add places list support
Set ItemList with places information to PlaceListMapTemplate to show the list of places i.e. list of charging stations in our scenarios.
override fun onGetTemplate(): Template {
  val placesRow = PLACES.map { getPlaceRow(it) }
  val itemListBuilder = ItemList.Builder().apply {
    placesRow.forEach { row -> addItem(row) }
  }

  return PlaceListMapTemplate.Builder()
    .setTitle("Mountain View area")
    .setItemList(itemListBuilder.build())
    .build()
}
The PLACES object is a list of Place data class objects with information to show list items.
/** Data class for individual charging station location information. */
data class Place(
  val id: Int,
  val name: String,
  val lat: Double,
  val long: Double
)

val PLACES = listOf(
  Place(id = 0, name = "EVgo Charging", lat = 37.3788, long = -122.0756),
  Place(id = 1, name = "Electrify America Charging", lat = 37.4041, long = -122.1092),
  Place(id = 2, name = "Tesla Supercharger", lat = 37.4177, long = -122.0774),
)
Create each list item using the Row model. As per the guideline, each text item must have DistanceSpan to define it as place data.
private fun getPlaceRow(place: Place): Row {
  return Row.Builder()
    .setTitle(place.name)
    .addText(SpannableString(" ").apply {
      setSpan(
        DistanceSpan.create(
          Distance.create(Math.random() * 100, Distance.UNIT_KILOMETERS)
        ), 0, 1, Spannable.SPAN_INCLUSIVE_INCLUSIVE
      )
    })
}

7. Add location marker support
To add a location marker on a map, the metadata needs to be added with location information to each row item.
private fun getPlaceRow(place: Place): Row {
  return Row.Builder()
    .setTitle(place.name)
    .addText(SpannableString(" ").apply {
      setSpan(
        DistanceSpan.create(
          Distance.create(Math.random() * 100, Distance.UNIT_KILOMETERS)
        ), 0, 1, Spannable.SPAN_INCLUSIVE_INCLUSIVE
      )
    })
    // Metadata added to show location marker
    .setMetadata(getMetadata(place)).build()
}
The metadata model from Place data object can be created as follows:
private fun getMetadata(place: Place): Metadata {
  return Metadata.Builder()
    .setPlace(
      Place.Builder(CarLocation.create(place.lat, place.long))
        .setMarker(PlaceMarker.Builder().build())
        .build()
      )
    .build()
}

Android Auto UI Guidelines
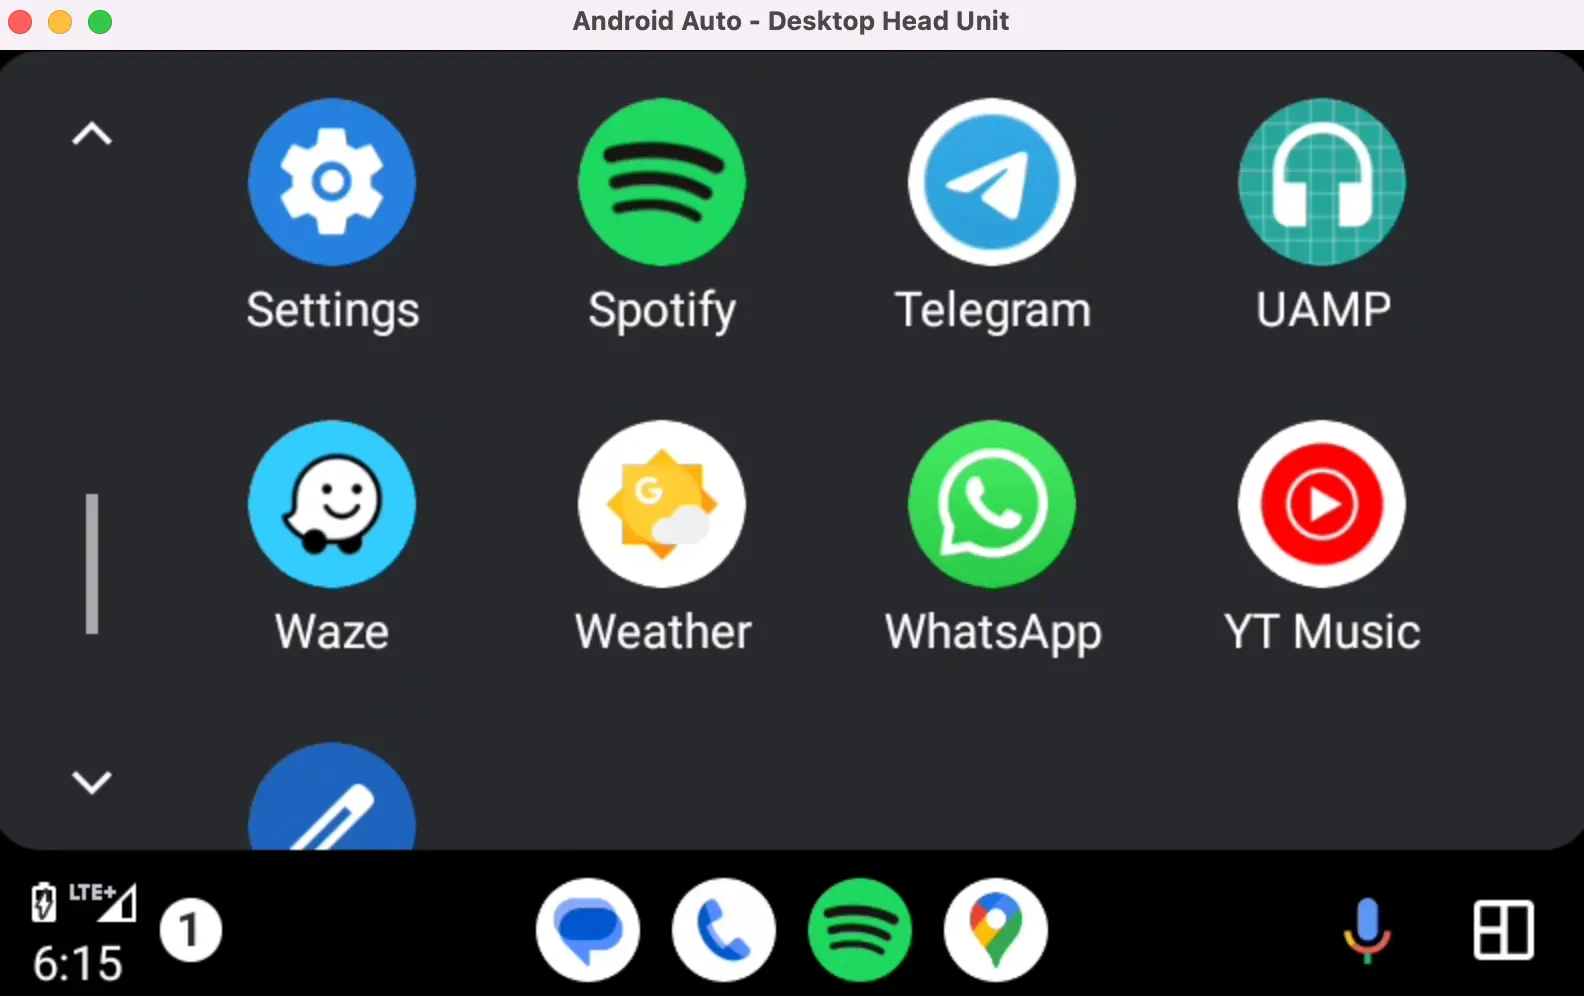
The Android Auto UI is designed to be simple and intuitive, with a layout similar to an Android device. The home screen displays the navigation, the music app, and a list of recently used apps at the bottom for quick access. Clicking on the grid-like icon button shows app icons in a grid, allowing easy access. You can interact with Android Auto using Google Assistant voice control or the car infotainment system’s built-in controls like a touch screen, knobs, buttons, etc. This allows you to use your phone while focusing on driving.
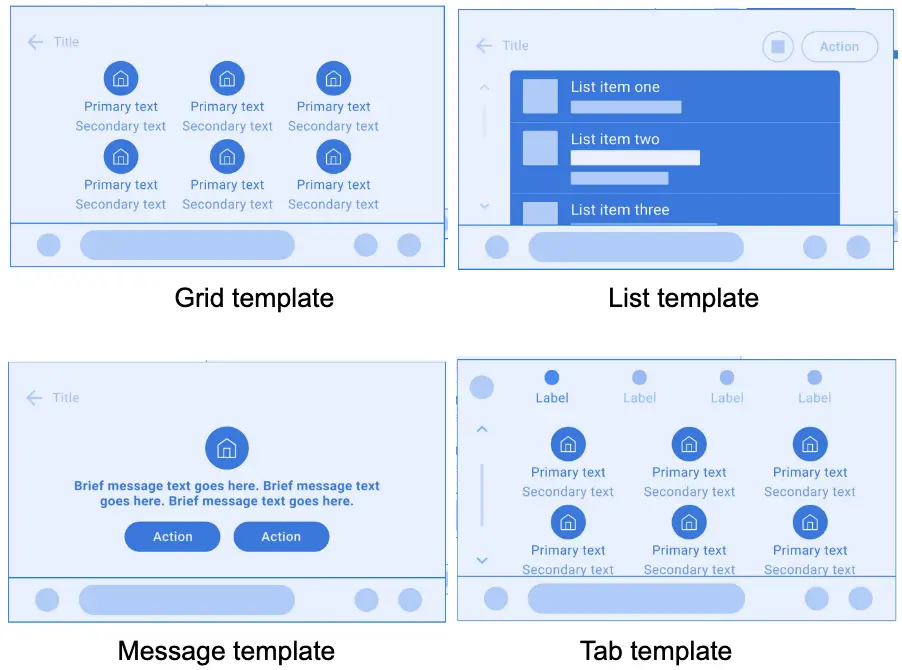
To make Android Auto apps easy to use, safe, and optimized for driving, Google has provided a set of predefined UI templates which Android Auto apps can use to define the app UI. The interface is rendered by an Android device on the Car display, so developers do not need to adjust their layouts for different screen resolutions or manage input from different types of hardware. Some examples of these templates are added below:
Here are some restrictions while using Templates:
- There are limits to the number of templates and types of templates we can use.
- The number of templates to display for a given task is limited to 5 and the last template must be one of the
NavigationTemplate,PaneTemplate, orMessageTemplate. - The number of items on the screen is limited to minimize distraction for the driver. This imposes restrictions on the number of list items, and grid items shown at a time on screen. As this is dependent on screen sizes the limit could be obtained with
ConstraintManagerAPI. - Other distracting things like long text and certain features like keyboard input are disabled.
Android Auto apps should be designed to enable drivers to use them without losing focus on driving. A few important factors to consider:
- Keep information current and glanceable.
- Prioritize driving tasks and discourage distraction.
- Make content easy to read.
- Make targets easy to touch.
- Keep UI elements consistent.
Google’s Car OS - Android Automotive
In order to support automakers, Google has a separate OS called Android Automotive OS (yes, it is quite confusing) that is meant to power the entire automobile dashboard and infotainment systems — these can be customized to reflect the automaker’s brand. The OS has an integrated App store, where users can download the available apps and use them directly on their cars. A number of car companies like BMW, Volkswagen, Polestar have started using Android Automotive in some of their cars.
Note that Android Automotive OS supports Apple CarPlay and Android Auto — so you can still connect your smartphone and use apps on your smartphone.
A more detailed discussion of Android Automotive OS is beyond the scope of this article — we briefly mentioned it here just to call out the fact that it is different from Android Auto, which is the focus of this article.
Wrapping Up
In this post, we learnt about Android Auto — a technology that enables Android device users to use their Android devices through their car’s infotainment system. We hope this article gets you started on your Android Auto app development journey.
Happy learning!