Generative AI tools like ChatGPT allow users to use a conversational style to get detailed responses on a variety of topics. They typically use public data on the internet as their knowledge base.
However, there is a big demand to develop custom tools that provide a similar functionality but use proprietary data in addition to the public data. Imagine a company that wants to develop a ChatGPT-like tool that allows users to get details on the company’s products, documentation and other data that is not public.
In this blog post, we are going to explain how to develop a chatbot that is fed additional proprietary (non-public) data that it can use to answer user queries. This is sometimes referred to as a “domain specific chatbot” as it has knowledge of domain specific data that we will supply. We will be using OpenAI tools and APIs for this article, but you can use any LLM API for this.
Domain-Specific Chatbots - How do they work?
Breaking Down a ChatGPT Response
Before we get started on domain-specific chatbots, let’s have a look at how ChatGPT generates responses to any questions you ask.
ChatGPT is a text based GenAI tool that internally uses a Large Language Model (LLM). An LLM is an AI model designed to understand and generate natural human language. They undergo pre-training on large text data, acquiring the ability to take input text and predict the most likely output text which will follow.
Let’s take an example to understand how this works at a high-level:
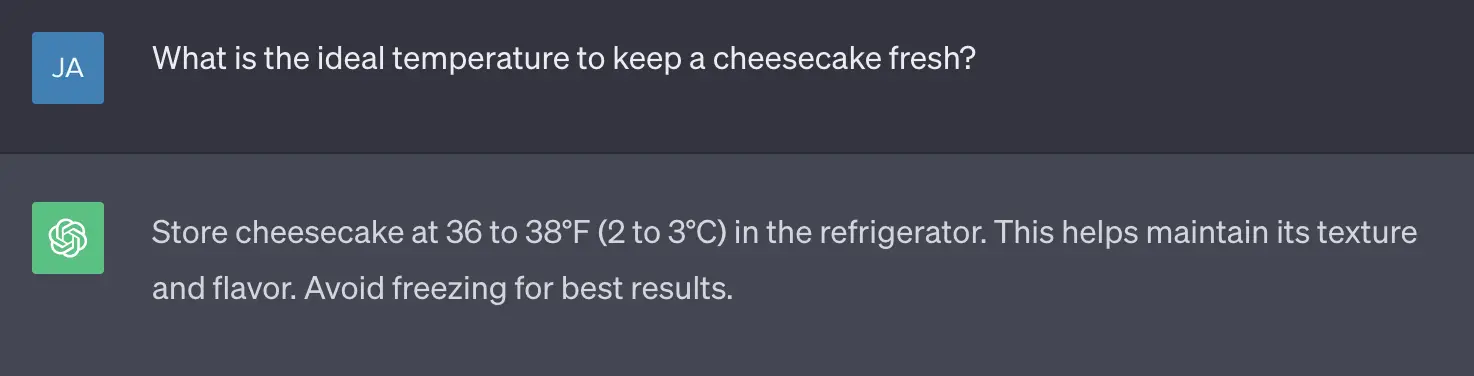
Imagine you own a bakery and you recently started making New York style cheesecakes but worried about their freshness. If you ask ChatGPT “What is the ideal temperature to keep a cheesecake fresh?”, it provides a pretty accurate answer.
The input provided to LLM, the Cheesecake question in our case, is called a prompt. When a prompt is given to LLM, it breaks the prompt text into tokens. They are small units of text that can be words, characters, or subwords, depending on the type of LLM being used. The process of generating these tokens is called tokenization, and it is carried out to reduce the input size and facilitate easier processing for the model. OpenAI has a rough rule of thumb that a token is about 4 characters, but this is not absolute. The below image illustrates how our prompt about Cheesecake was broken into tokens.

LLMs do not understand human words literally, so they encode these tokens into numerical form. The result of these encodings are called Embeddings. Embeddings of our Cheesecake prompt would look as shown in the below image.

LLMs are trained on massive amounts of text data, and during this training process, the LLM (like GPT-3.5) converts each data element from the training dataset into embeddings. The LLM then applies complex calculations on them to deduce information like positions of the words, relationships between words, language semantics and other aspects, and persists these learnings.
After generating embedding for tokens of the input prompt, the LLM processes those embedding and utilizes the knowledge it has learnt from the training phase (about sentencing, relationship of words, probabilities of patterns) to generate the most probable numerical data it should be followed up with. This generated numerical data is then decoded back into text. We received the response for our Cheesecake prompt in a similar fashion.
Responses with Domain-Specific Data
In the above example, LLM provided an answer to our question “What is the ideal temperature to keep a cheesecake fresh?” from its pre-trained data set. But what if the question is more specific to the bakery store such as “How were the Cheesecake sales in the last week of September?” The LLM does not have details on the bakery’s sales so would likely hallucinate i.e. providing a made-up answer.
To enable LLMs to deliver accurate responses based on a knowledge base, the relevant information from the knowledge base needs to be retrieved and incorporated in the prompt. For example, consider we have the following information for sales present in our knowledge base:
September sales:
# Week 1 - Cheesecake: 15, StrawberryCake: 10, Cheese cubes: 18
# Week 2 - Cheesecake: 11, StrawberryCake: 5, Cheese cubes: 30
# Week 3 - Cheesecake: 12, StrawberryCake: 12, Cheese cubes: 15
# Week 4 - Cheesecake: 14, StrawberryCake: 11, Cheese cubes: 20
Let’s use this information while creating a prompt and ask ChatGPT. Here’s the image of the prompt and ChatGPT’s response, it is an accurate answer for our question.
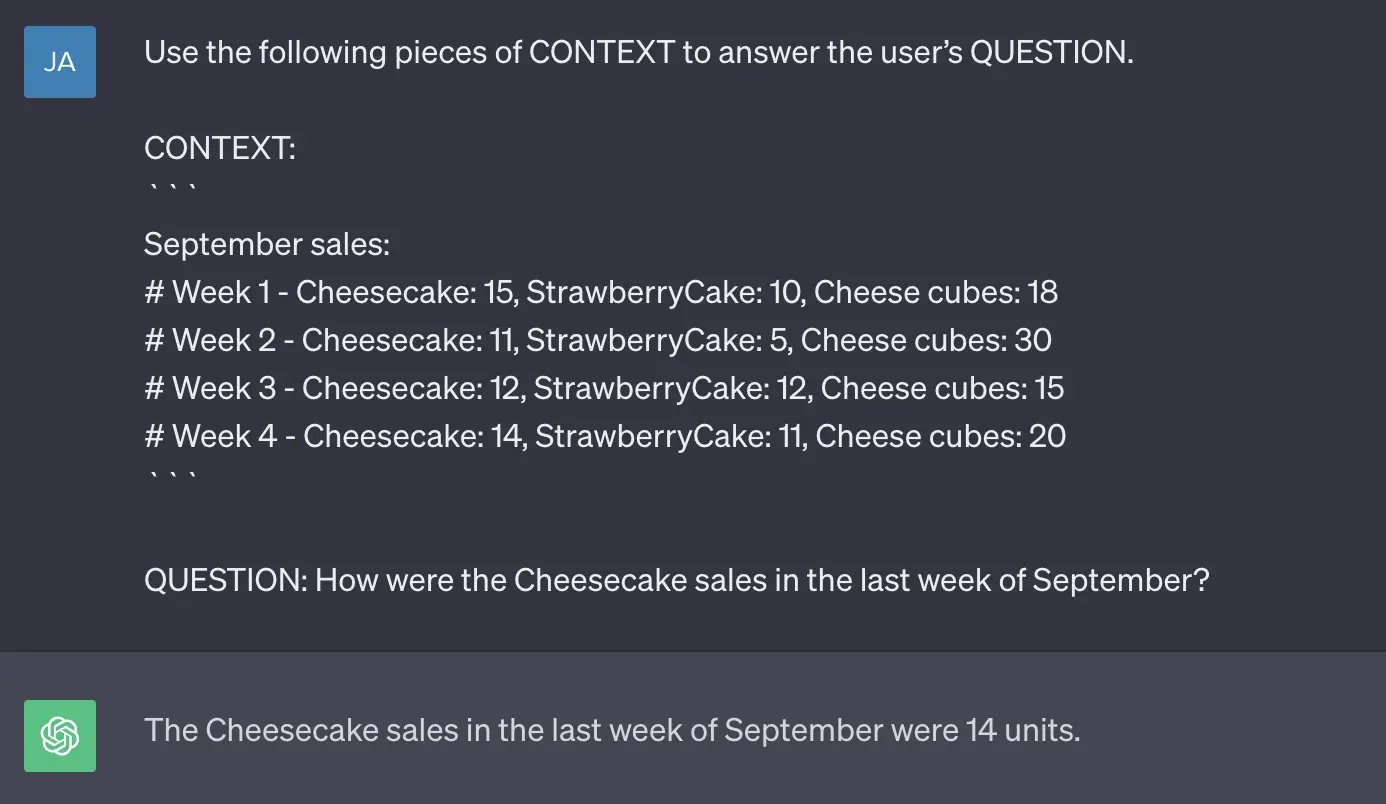
As seen in the above example, the prompt contains both the question, and context information retrieved from our knowledge base. The technique we have used to enable LLMs to deliver responses based on domain-specific knowledge is known as Retrieval Augmented Generation (RAG).
Domain-Specific Chatbot - Architecture and Working
The RAG technique combines LLM with an Information Retrieval (IR) system, where the LLM is responsible for generating text and the IR system is responsible for retrieving relevant information from a knowledge base. We will be using this technique to build our Chatbot.
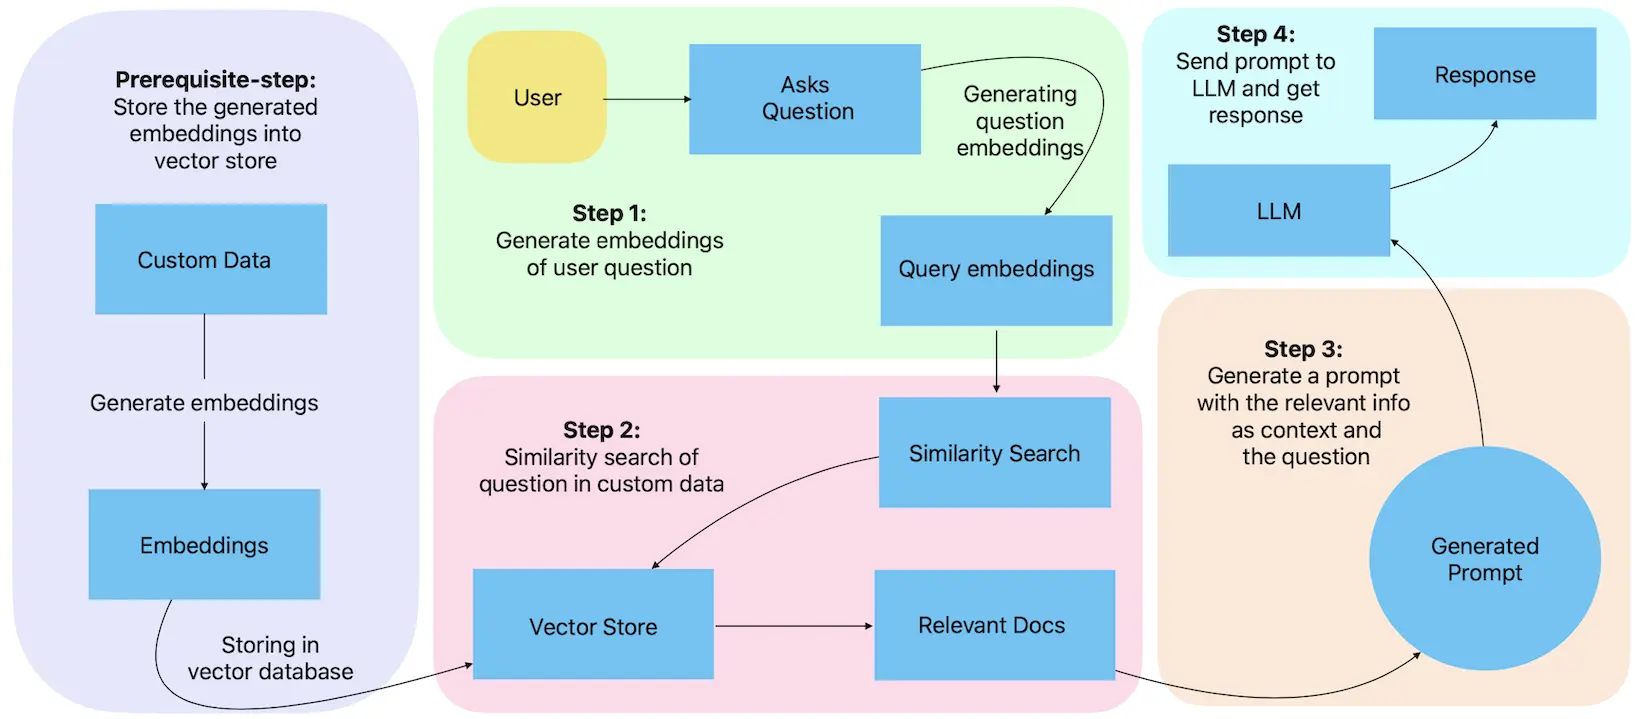
Before using this technique with a Chatbot, the user’s knowledge base needs to be transformed into embeddings (i.e. encoding data into numerical form which is typically represented as vectors) and stored in a database called vector store. These embeddings allow LLM algorithms to understand and process text data more effectively. It also makes the knowledge base searchable based on user queries.
Once the embeddings of the knowledge base are generated, following steps will be performed to get LLM responses specific to the knowledge base for given questions.
-
Generate embeddings (i.e numerical representation) of the input question. For example, in our case generating embeddings for the “How were the Cheesecake sales in the last week of September?” question.
-
The question embeddings are then searched within the embeddings of the knowledge base to find a similar match. For our bakery example, there will be a search within the entire knowledge base available for the bakery. It will likely provide the data for September sales as that would match the most with our question.
-
Create a prompt which combines the retrieved relevant information about the question and the question itself. In our case, we used the “Use the following pieces of CONTEXT to answer…” prompt (as shown in the image above).
-
The prompt is then sent to the LLM, which reads the provided information and answers the query. In our example, “The Cheesecake sales in the last week of September were 14 units.” was the response by ChatGPT.
The below image illustrates the RAG technique which we are going to follow in this blog to create custom-data driven Chatbot.
Let us Start Building the Chatbot
We will be following below steps:
- Initial setup to get OpenAI API key and initial libraries setup.
- Load the knowledge base (Text, PDF, Spreadsheet) into the LLM preferred structure.
- Generate and store embeddings (encodings) of the knowledge base.
- Deep dive into similarity search.
- Generate prompts to instruct LLM.
- Save and retrieve past conversations with LLM for individual users.
The end-to-end code for the chatbot we have created can be found here.
Get OpenAI API keys and Install Necessary Libraries
Follow below steps to generate OpenAI API key:
- Log into https://platform.openai.com/
- In the top-right corner go to “View API keys”
- Generate your API key by tapping “Create new secret key”
Set OpenAI API key in environment variable (.env):
OPENAI_API_KEY=YOUR_API_KEY
Check all the prerequisites to run the Chatbot code demo. You can install the libraries listed in the requirements file by executing pip3 install -r requirements.txt command. Once all the libraries are installed, you can start with using the OpenAI API key for the Chatbot.
Load and use the OpenAI API key from environment variable (main.py):
class Main():

    def __init__(self):
        load_dotenv()
        openai.api_key = os.environ["OPENAI_API_KEY"]
        langchain.debug = True
Before we jump into the actual code, let us briefly talk about the LangChain library which we will use in this tool. LangChain is an open-source framework which provides many helpful APIs, wrappers and interfaces to work with multiple LLM solutions including OpenAI. In our tool, we are going to use LangChain APIs to parse the knowledge base files, create embeddings, similarity search and call OpenAI APIs.
Load Custom Data from Knowledge Base
A typical knowledge base has a variety of file types such as .txt, JSON, CSV, .doc, .pdf etc. LangChain offers loaders to parse data from files into a format that can be understood by the LLM. This may involve splitting the data into sentences, making key-pair values, or converting the data to a different encoding. Let’s understand this using a CSV (Comma-Separated Values) file example.
The typical structure of a CSV file consists of an initial row that holds the column headers or field names, followed by rows containing the actual data values for those respective columns. If an individual row is fed to the LLM, it won’t understand it properly as a single row data does not have column names associated with it. The CSVLoader transforms each row into a key-value pair where key being a column and value being data from the row. Basically, this approach keeps column names and row values together, aiding LLM’s comprehension of the data by preserving value context.
To use CSVLoader, you simply provide the CSV file’s path as an input, and it will return a list of “documents”. In this context, a “document” corresponds to a single row in the CSV file, presented as a key-value pair.
Here’s how CSVLoader can be used on a file:
# Converted an excel file to CSV
excel_file = pd.DataFrame(pd.read_excel(path_of_xlsx_file))
excel_file.to_csv(path_of_save_converted_csv_file, index=None, header=True)

# Use CSVLoader to load the CSV file
csv_loader = CSVLoader(file_path=conveted_csv_name)
print(csv_loader.load())
Different loaders need to be used to load data from files depending on their type (TextLoader for txt, PyPDFLoader for PDF, Docx2txtLoader for docx, JSONLoader for JSON, etc). We can define a load_custom_data function that returns the correct loader to be used depending on the file’s extension. Refer to load_custom_data.py for the code that returns the correct loader.
For this example we will be using a dummy hospital management dataset containing a variety of data files. You can access and download it from here.
Generate Embeddings of the Data
The next step after loading the data is to convert the data into Embeddings. Embeddings in GenAI are numerical representations that encode the meaning and relationships of words, objects, or data, enabling AI systems to understand and process them effectively. In technical terminology, embeddings are high-dimensional numerical representations of data, often in the form of vectors. These vectors capture essential characteristics, features, and semantics of the data.
OpenAI has given an API to generate embeddings of any text data. We need to send POST requests with data at https://api.openai.com/v1/embeddings/. While we simply have to call an API to generate embedding, LLMs internally apply different complex calculations on words to transform them into numerical form.
Generate embeddings using LangChain:
embeddings = OpenAIEmbeddings()
doc = load_custom_data()
embeddings = embedding.embed_documents(doc)
The piece of code shown above generates embeddings of our custom data. It uses LangChain’s “embeddings” interface which internally calls OpenAI’s “embeddings” API.
Store and Load the Embeddings through FAISS
The embedding API comes with an associated cost, which means that generating embeddings for the entire dataset for each user query would result in a significant cost. To mitigate this cost, it is advisable to store and retrieve embeddings from a vector database.
There are numerous vector storage options available including Pinecone, Chroma, Milvus, FAISS, Supabase, various cloud-based solutions (such as Amazon, Google, and Azure), and more. We are going to use FAISS vector storage to store our embeddings. FAISS stands for Facebook AI Similarity Search. It is an open-source library developed by Meta’s AI research team that is primarily used for efficient similarity search and clustering of large datasets. Langchain provides good support for FAISS which enables seamless integration of similarity search.
This code demonstrates embedding storage and retrieval with FAISS (store_embeddings.py):
__faiss_folder_path = "data/generated/embeddings_storage"
"""Path to store the generated embeddings through FAISS."""

def get_faiss_database_with_all_docs(self) -> FAISS:
    """Checks whether FAISS vector storage for embeddings is present in the specified path.
    If embeddings are already available, it returns the existing store;
    Otherwise, it generates embeddings from custom data and stores them in the specified path.
    """

    openai_embeddings = OpenAIEmbeddings()
    if (os.path.exists(self.__faiss_folder_path)):
        # Fetch locally stored embeddings from FAISS.
        docsearch_faiss = FAISS.load_local(
             folder_path=self.__faiss_folder_path, embeddings=openai_embeddings)
        return docsearch_faiss
    else:
        # Retrieve the knowledge base.
        custom_data_loaders = LoadCustomData().load_custom_data()
        load_all_documents = self.__get_list_of_doc_from_loaders(
                loaders=custom_data_loaders)

        # Generate embeddings of the retrieved knowledge base.
        docsearch_faiss = FAISS.from_documents(
                documents=load_all_documents, embedding=openai_embeddings)

        # Save the embeddings in the local path.
        FAISS.save_local(self=docsearch_faiss,
                folder_path=self.__faiss_folder_path)
        return docsearch_faiss
Here, the FAISS.from_documents method generates embeddings from the given documents internally and returns an instance of the FAISS vector store. The FAISS.save_local function stores these newly generated embeddings at the specified path. To access the stored embeddings, you can use the FAISS.load_local function, which will return an instance of the FAISS vector store containing the embeddings.
Similarity Search of Prompt
Now it’s time to fetch relevant data based on the prompt.
Similarity search is a process of retrieving items or data points from a collection that are most similar to a given query item. It is important to know that this is not a common word search. Let’s understand this with an example.
Assume we have 3 documents (recap: document is chunk of text):
- Doc 1: I have a Dog named Pluto and he is very cute.
- Doc 2: Some cats like to scratch their owners.
- Doc 3: Tesla’s Model S has 322 kmph top speed.
Their embeddings may look something like below:
- Doc 1: [0.2, 0.4, 0.1, 0, 0, 0, 0]
- Doc 2: [0, 0, 0.2, 0.3, 0.3, 0, 0]
- Doc 3: [0.15, 0.20, 0.21, 0.50, 0.17, 0.12, 0.14]
If the query is about “pet” then in the similarity search, both Doc 1 and Doc 2 will get picked up even though they do not have “pet” in their text. This is because “Dog” and “cat” are associated with the word “pet” in embeddings. On the other hand, Doc 3 may not be picked up in the similarity search.
There are two main types of similarity search: Cosine similarity search and Dot product similarity search. Both of them aim to find objects in a dataset that have a high degree of similarity to the query. Cosine similarity search is the more commonly used approach, focusing solely on the angular difference between vectors when determining similarity and disregarding vector magnitude. In contrast, Dot product similarity search considers both angular difference and vector magnitude in its calculations. Getting further into the technical differences is out of scope of this blog.
Generally, vector stores (like FAISS) offer the functionality to perform a similarity search among the stored embeddings. To conduct such a similarity search, we need to use embeddings for the user’s query.
The following code show how to achieve similarity search within FAISS (query_search.py):
__score_threshold = 0.75
"""Floating point value between 0 to 1 to filter the resulting set of retrieved docs"""

__no_of_doc_to_return = 3
"""Number of Documents to return."""

def similarity_search(self, query: str):
    """Applies similarity search with the query on the FAISS vector store and returns relevant information from the knowledge base."""

    # Get the knowledge base from FAISS.
    faiss = StoreEmbeddings().get_faiss_database_with_all_docs()

    # Cosine similarity search with a query in the knowledge base.
    retrieved_documents = faiss.similarity_search_with_score(
            query, search_kwargs={
            "score_threshold": self.__score_threshold, "k": self.__no_of_doc_to_return})
    return retrieved_documents
The faiss.similarity_search_with_score method does the similarity search for the provided query. It internally creates embeddings of the query and returns documents which have an equal or higher threshold to score_threshold value. FAISS organizes documents by their similarity, and the k parameter specifies how many of the top-ranked documents should be returned. In this example we are retrieving the top 3 documents in the search.
Create a Prompt with Input and Context
At this stage, we have a query and context string extracted from custom data. Let’s formulate a prompt that incorporates this information and furnishes sufficient context to enable LLMs to generate a valid response.
The following method provides a prompt to be sent to OpenAI (prompt_generation.py):
def generate_prompt():
    """Returns prompt template to have effective Q&A on custom-data."""

    prompt_text = """
Act as a smart assistant in a hospital. Use the following pieces of CONTEXT to
answer the user’s QUESTION related to the hospital environment. If you don’t
know the answer, just say that you don’t know, don’t try to make up an answer.

CONTEXT: ```{context}```

QUESTION: {question}

It is very IMPORTANT that after providing a complete answer for the QUESTION,
you also need to provide JSON with a "summary" key containing a very short
summary of your answer and a "question" key containing the asked QUESTION."""
In the generate_prompt method we added our prompt which has context and question as variables. This prompt uses a role-playing technique by telling LLM that to act as a smart assistant in a hospital (given we are using mock hospital data as a custom knowledge base here). Then we instruct LLM to provide answers for the user’s question by looking at the given CONTEXT. Also, it explicitly tells LLM to not provide any made up answers to reduce hallucinations.
Initiate Q&A
We are ready to send our prompt with query and context to OpenAI and receive a response.
Invoke the following method to have Q&A on custom-data (main.py):
def start_chat(self, user_query: str) -> str:
    llm = ChatOpenAI(temperature=0, model_name="gpt-3.5-turbo")

    # Generate prompt.
    prompt_template = PromptGeneration().generate_prompt()
    chain = LLMChain(llm=llm, prompt=prompt_template)

    # Similarity search based on the user query.
    context = QuerySearch().similarity_search(query=user_query)

    # Invoke chains.
    response = chain({"question": user_query, "context": context})

    return response["text"]
In the code block presented above, we’ve used ChatOpenAI from LangChain (Wrapper around OpenAI Chat LLM), configuring OpenAI’s LLM that we’ll be using for question and answer interactions. By default, it will use gpt-3.5-turbo LLM. We have set the temperature parameter to zero because we want to keep the answer very precise (and reduced hallucinations).
The code also uses an important interface provided by LangChain which is Chain. They serve as logical connections among one or more LLMs. In the above code snippet, we have used a simple implementation of Chain which is LLMChain and supplied OpenAI’s llm and the prompt_template.
The instance of LLMChain executes with context and query which will be configured to the prompt_template. Internally, this setup generates a prompt with the query and context, invokes OpenAI’s Chat completion API, and then returns the response.
Use Chat History to Maintain Context
We have developed a Q&A bot that can provide answers based on a specific knowledge base; however, it currently lacks the ability to respond to questions that require context from previous conversations. To achieve this functionality, the prompt (the instruction for the LLM) needs to be updated, and obviously the conversations need to be stored and retrieved.
Prompt update
Along with the query and context, we need to include the previous conversation in the prompt so that LLM can refer to it while answering the query. However, adding entire conversations to the prompt would increase its length with each conversation. Given that prompts have a token limit (currently around 4k for the GPT-3.5 model) and a price associated with it, we must control the prompt length.
For most use cases, we might not need the entire previous answer as a reference to address the current question; a summary of the answer should suffice. We can modify the prompt to instruct LLM to provide the summary of the answer along with the actual answer. Additionally, we can limit the number of conversations we include in the prompt. This is because not all conversations would be important for reference; in this example we will use the last five conversations in the prompt.
Prompts that are needed to use previous conversation (prompt_generation.py):
prompt_text = """
Act as a smart assistant in a hospital. Use the following pieces of CONTEXT,
PREVIOUS_CONVERSATION to answer the user’s QUESTION related to the hospital
environment. If you don’t know the answer, just say that you don’t know, don’t
try to make up an answer.

CONTEXT: ```{context}```

PREVIOUS_CONVERSATION: ```{previous_conversation}```

QUESTION: {question}

It is very IMPORTANT that after providing a complete answer for the QUESTION,
you also need to provide JSON with a "summary" key containing a very short
summary of your answer and a "question" key containing the asked QUESTION.
"""
Manage Conversations
There are numerous storage options available for storing conversation history. In this blog, we will use MongoDB, which offers straightforward procedures for storing conversations for a single session or user. To use it, a connection string from MongoDB is required. You can log in or sign up on MongoDB Atlas and follow this link to obtain the connection string. Conversations in MongoDB can be saved and retrieved using the code snippet below.
Save and extract conversation from MongoDB (manage_conversations.py):
connection_string = "mongodb://mongo_user:password123@mongo:27017"

def save_conversation(self, query: str, answer: str, userId: str):
    message_history = MongoDBChatMessageHistory(
        connection_string=self.__connection_string, session_id=userId)
    message_history.add_user_message(query)
    message_history.add_ai_message(answer)

def get_previous_converstions(self, userId: str) -> str:
    """Retrieves stored conversations from MongoDB for the given user ID."""
    message_history = MongoDBChatMessageHistory(
        connection_string=self.__connection_string, session_id=userId)
    prev_conv = ""
    for msg in reversed((message_history.messages[-5:])):
        prev_conv = msg.content + " " + prev_conv

    return prev_conv
Additionally, JSON containing summary and question from the LLM’s response can be extracted by checking last indexes of open & closed curly braces - check this extract_summary() function for more details.
Start Chatting
We are nearly there - we just need to expose an API which lets us consume the functionality we added. Let us do that.
Running this code enables AI chat using custom data and prior conversations (main.py):
def start_chat(self, user_query: str, userId: str) -> str:
    # Select LLM with randomness in the generated text and the GPT model.
    llm = ChatOpenAI(temperature=0, model_name="gpt-3.5-turbo")

    # Extract previous conversations and questions.
    manage_conversation = ManageConversations()
    prev_conversation = manage_conversation.get_previous_converstions(
userId)

    # Generate the prompt based on previous conversation.
    prompt_template = PromptGeneration().generate_prompt(prev_conversation)
    chain = LLMChain(llm=llm, prompt=prompt_template)

    # Append all user queries for similarity search.
    question = user_query
    if (prev_conversation and prev_conversation.strip()):
        question = user_query + prev_conversation
    context = QuerySearch().similarity_search(query=question)

    # Invoke chains based on availability of past conversations.
    if (prev_conversation and prev_conversation.strip()):
        response = chain({"question": user_query, "context": context,
                    "previous_conversation": prev_conversation})
    else:
        response = chain({"question": user_query, "context": context})

    # Extract conversation and save it.
    manage_conversation.extract_and_save_conversation(response, userId)
    return response["text"]
In the code snippet above, we’ve retrieved the user’s past questions and incorporated them into the current question during the similarity search process. This step ensures that we can extract information related to the question from custom-data, even if the question refers to prior conversations. Apart from that, we’ve simply called all the various functions we’ve previously defined in the blog.
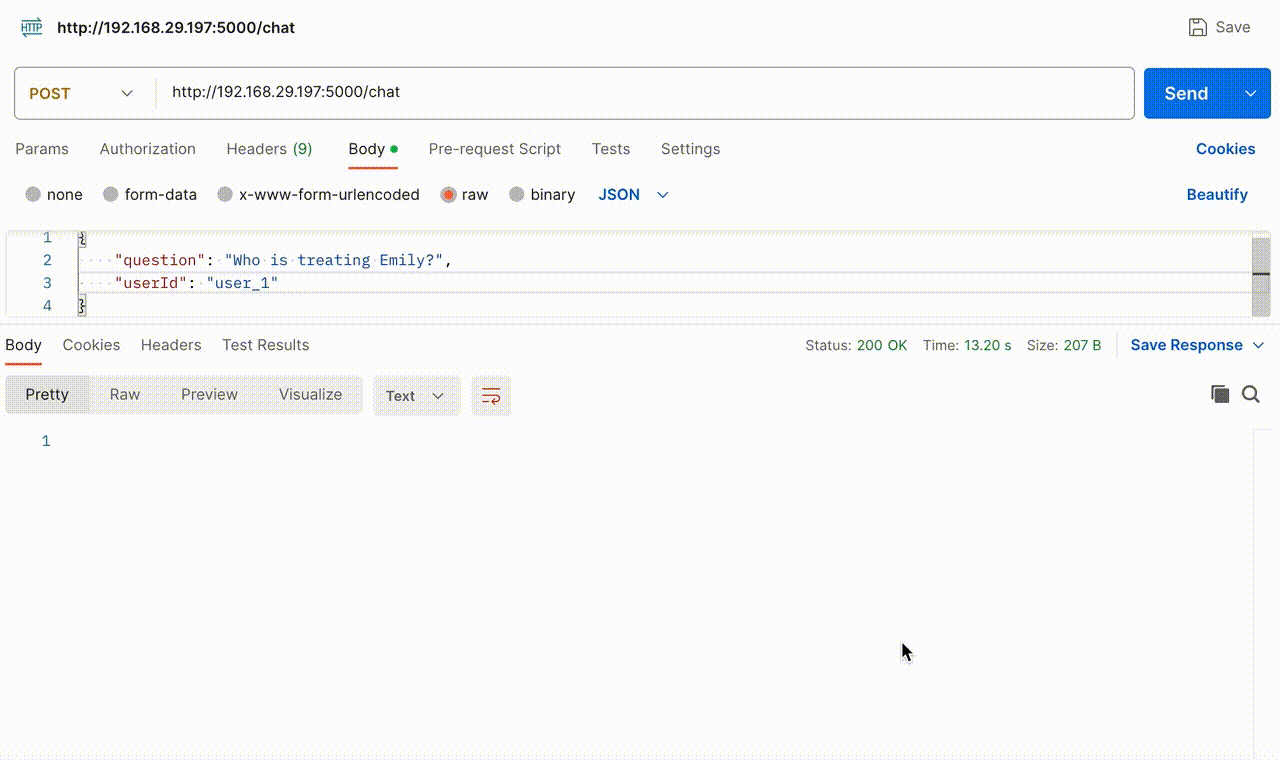
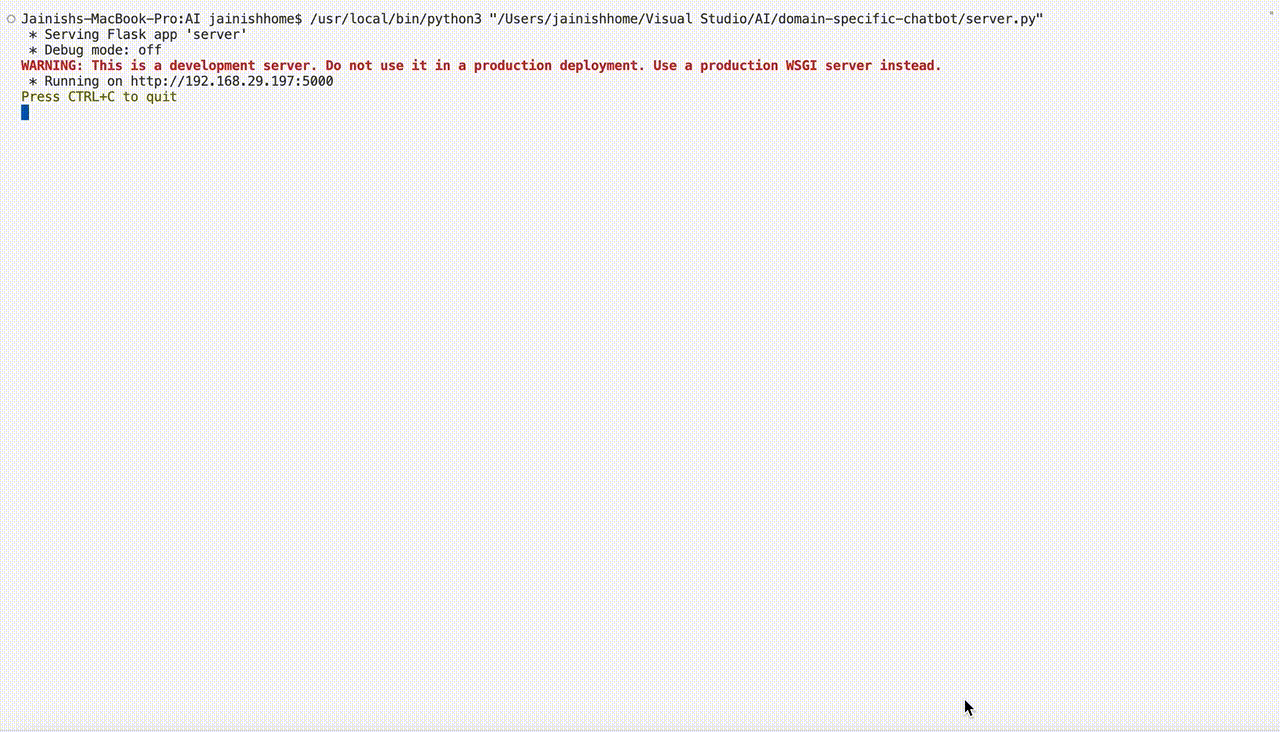
This start_chat() function can be invoked from an API and the API can be hit via any mobile or web application to have a chat with the LLM. The API endpoint should be equipped to receive a user query and the user’s ID in its request parameters. If such an API is not available, it can be created using the Python Flask framework which enables easy creation of server endpoints. You can refer to the server.py class which exposes /chat API.
Chatbot in Action
The following GIF demonstrates the Chatbot’s functionality when the API endpoint is hit with user query and userId. When asked, “Who is treating Emily?” it accurately retrieved the information from this document, stating that “Dr. Martinez” is the doctor. Subsequently, we inquired about “her” doctor without specifying the name, and the Chatbot precisely provided additional details about the doctor based on this document.
The GIF below provides a glimpse into the action that happens behind the scenes, offering a view of the questions asked by the user, the context fetched through similarity search and the final prompt sent to OpenAI.
Wrapping up
We just built a domain-specific chatbot which can be used for various use cases ranging from teaching materials, research papers, long transcripts, customer support inquiries, enterprise data QnA etc. While using this chatbot for your specific requirements, remember to customize the prompt based on your domain.
Check out our blog on prompt engineering to enhance the effectiveness of your prompts. Additionally, as a security and safety best practice, you should use OpenAPI’s moderations API to verify that user queries are safe and do not violate OpenAI’s usage policies.
The future of AI-driven conversations presents limitless possibilities for developers and businesses. By leveraging the power of data and innovative tools built using LLMs, we can lead the way in this transformative revolution.
Thank you for reading.