Imagine you have developed an application and it’s ready for release. A satisfying user experience, efficient app performance, smaller app size fulfilling Play Store requirements, and better security for your app’s source code are some parameters to be considered, before you go out and release it.
R8 and ProGuard are two such helpful companions which could help you achieve these.
In this blog post, we will explore R8, and how it would help to achieve optimization and obfuscation for your app. We will take a look at its benefits, how to integrate it into your development workflow, and debug issues that pop up while integrating or utilizing R8. We will also take a look at ProGuard and explore how it is different from R8. Finally, we will be going through some tips to use R8/ProGuard effectively.
What is R8?
In general, when a normal app written in Java/Kotlin is executed, its Java/Kotlin source code would be converted to Java/Kotlin bytecode and then the bytecode would be compiled to dex code (as dex is the format interpreted by Android).
This is a normal process to execute an app, but comes with certain disadvantages. For instance, the compiled bytecode is huge in size, which could lead to inefficient app performance and bigger app size. The compiled dex code could be easily reverse engineered and the app’s source code could be in public domain.
R8 could help you to do away with these disadvantages i.e. it could help to generate an optimized dex code from a generated bytecode. An optimized dex code is generated by shrinking pieces of unused source code, optimizing it and obfuscating it, to make it difficult for reverse engineering.
Hence R8, in simple terms, is a compiler used to generate optimized dex code from a Java/Kotlin bytecode.
R8 is often used as an alternative to ProGuard, another popular tool for code shrinking, optimization, and obfuscation. ProGuard was used prior to R8, and a major difference between their way of working is ProGuard creates optimized bytecode from normal bytecode and then creates dex code from it. Where R8 directly creates an optimized dex code from a normal bytecode. This, and a couple of more features, helps R8 to have an edge over ProGuard in terms of performance. We will look into these details in the upcoming sections.
Why do we need R8 in any app?
Implementing R8 into any app development process offers several compelling benefits as follows:
- Reducing App Size: R8 provides a code shrinking feature, which can help with removing unused code from the app’s APK or Android APK Bundles. R8’s code shrinking capability eliminates unused code, ensuring your app is more compact. This is especially crucial for mobile apps, where minimizing the download size is essential.
- Boosting Performance: With help of R8’s code optimization techniques, you can fine-tune your code, reducing startup times and ensuring a smoother user experience.
- Meeting Play Store Guidelines: R8 can increase the likelihood that you meet these guidelines by reducing your app’s size. This not only ensures compliance but also makes it easier to distribute your app through the official Play Store. 150MB is the maximum allowed compressed download size of APKs for one device generated from Android App Bundles. And 100MB is allowed maximum compressed download size of APK for apps published with APKs.
- Enhancing Security: R8’s code obfuscation feature protects your code from being spied on by attackers. By renaming classes, methods, and fields to less intuitive names, it adds a layer of security that makes reverse engineering and unauthorized access significantly more challenging.
- Protecting Intellectual Property: Your code represents your creative effort and innovation. Without proper protection, it’s susceptible to intellectual property theft. The obfuscation feature by R8 makes it difficult for others to copy or reproduce your code, safeguarding your unique solutions and ideas.
Key functions of R8
In the previous section, we briefly explored some of the advantages of utilizing R8. If we take a closer look, it becomes clear that R8 serves four primary functions: code shrinking, resource shrinking, code obfuscation, and code optimization. Now, let’s explore each of these individually.
Code Shrinking
Code shrinking (also known as tree-shaking) is the process of identifying and removing unused classes, fields, methods, and attributes from your application and its library dependencies. Over time, as you develop and modify your codebase, it’s common for unused code to accumulate. This unused code can include entire classes, methods, or even individual lines of code that are no longer required for the functioning of your app.
R8’s code shrinking feature analyzes your code and eliminates these unused pieces of code, resulting in a smaller, more streamlined application. The code-shrinking capability also makes R8 a valuable asset when dealing with the “64k reference limit”. The “64k reference limit” in Android refers to a limitation imposed on the number of methods (including fields and classes) that can be referenced within a single APK. For example, when you utilize only a limited set of APIs from a library dependency, the process of shrinking can identify the unused parts of the library code. It can then eliminate those unused parts from your app. Another simple example of code shrinking is the removal of an unused class file.
Resource Shrinking
The resource shrinking feature eliminates redundant resources from your packaged app, which includes unused resources within your app’s library dependencies. It happens after code shrinking, ensuring that after eliminating unused code, any resources that are no longer referenced can also be safely discarded. Basically after the code shrinking process, the resource shrinker can identify the resources which are now unused and can eliminate them.
The removal of unused image resources can have a significant impact as they are often the largest part of the APK. R8 ensures that your application only includes the assets required for its functionality. For example, unused image resources from your application.
Obfuscation
The general terminology “obfuscation” means to make something obscure or unclear. Code obfuscation involves transforming the code in a way that retains its functionality but makes it significantly less readable and comprehensible to humans. Obfuscation can make it more difficult for reverse engineers to decompile and understand your app’s code, which can help to protect your app from being hacked or your app’s source code being stolen.
R8 mainly obfuscates the code by renaming the classes, methods, and fields with new short random names. For example, a method named getSpannableStringFromTransformedServerData() will be renamed to a().
Optimization
This feature helps in reducing your app size as well as improving its efficiency. R8 inspects code and removes unreachable code from the codebase. For example, an unreachable else block from the if...else is removed. Also, if a method is called only once in your code, R8 might optimize by removing the method and incorporating its functionality directly at the sole location where it is called.
Now you must be wondering…
How to enable R8 for any app?
R8 is available by default, but enabling it for your Android app involves a series of steps, typically performed within your app’s Gradle build files. Here’s a step-by-step guide on how to enable R8 for your Android app:
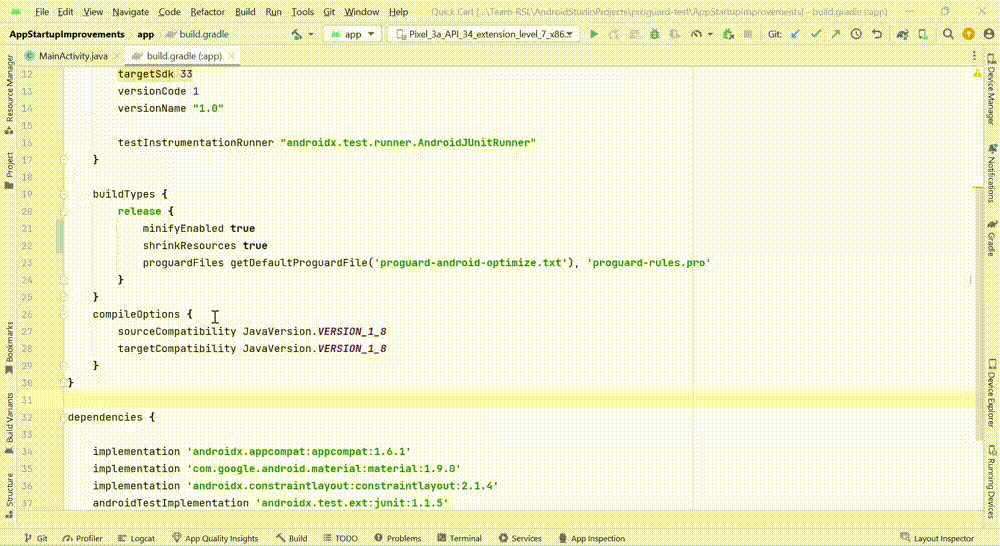
1. Add R8 configuration in “build.gradle” file of the app
Inside the android block of your app module’s build.gradle file, add the following lines to enable R8 for release builds:
buildTypes {
  release {
    minifyEnabled true
    shrinkResources true
    proguardFiles getDefaultProguardFile('proguard-android-optimize.txt'), 'proguard-rules.pro'
  }
}
The minifyEnabled true line enables R8 for the “release” build type. The shrinkResources is an optional field you can set to remove the unneeded resources.
2. Create R8 Configuration File
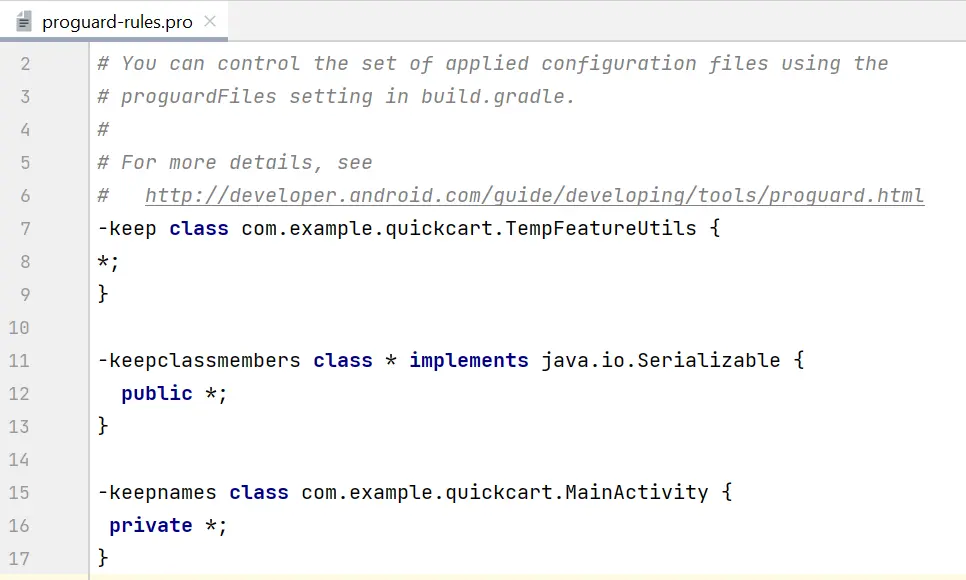
Next, you have to create a configuration file (usually named proguard-rules.pro) if you don’t already have one. This file should be placed in the root directory of your app module. In this file, you can specify rules to customize the optimization and obfuscation process. We will look into rules in the next section of this blog, but below is a sample image of how the file and rules look like.
3. Ensure the app is set to “release” variant
After enabling R8 and customizing the R8 rules, you have to build your app using the “release” build type. Selecting the “release” variant is crucial as the R8 configuration is set on it, and will not have any effect on the generated APK for any other variants.
Refer below GIF for steps to select the “release” build variant in Android Studio.
4. Build it
Next, you can build the app by selecting the following in Android Studio: Build > Build Bundle(s) / APK(s) > Build APK(s) OR Build Bundle(s)
You can analyze the R8 changes on an APK or even an Android App Bundle. More on this in a later section of the blog.
And by this setup, you get a R8 optimized APK for your app.
Different rules used for configuring R8
In some cases, R8 does not know if a class or method is being used and it might remove it while optimizing, especially for XML resources. This might lead to ClassNotFoundException or MethodNotFoundException at run time, causing the release build to crash.
When classes or methods are accessed only through dynamic means, like reflection, R8 can sometimes struggle to determine their usage, while constructing the code dependency graph. As a result, it may incorrectly remove these classes or methods. This situation can also arise when your code is exclusively referenced from XML resources, which often relies on reflection behind the scenes.
To handle such cases and to ensure some particular code is not removed by R8, we can specify rules. These rules simply tell R8 to not remove a particular class or method. But before looking into these rules, let’s first understand…
Where should we add these rules?
If you look at the configuration code, you will encounter two file names: proguard-android-optimize.txt and proguard-rules.pro. The method getDefaultProGuardFile('proguard-android-optimize.txt') retrieves default ProGuard rules (R8 and ProGuard both use the same set of rules) from the Android SDK.
Conversely, Android Studio generates empty rule files, i.e. proguard-rules.pro, in your module’s root directory. Therefore, it’s essential to incorporate your custom rules into the proguard-rules.pro file. Note that the file name may vary if you have renamed it or created a new one, but ensure that the name aligns with your build.gradle configuration.
Rules
There are a lot of rules and customizations available in R8, we will look into some of those below.
- keep
- This rule allows you to preserve specific classes, methods, or fields as entry points of your code. In simple terms, we are telling R8 to keep this code and not remove it.
- The keep rules should be used to retain critical code that should not be altered during optimization. This includes entry points, reflection related code, etc.
- Example:
-keep class com.example.myapp.MyClass {
  *;
}
- keepclassmembers
- This specifies that the class members i.e. fields and methods be preserved if and only if their classes are preserved as well.
- This rule can be best used when you have a mix of methods and fields in a class and you want to selectively retain some of them.
- For example, you might wish to retain all the serialization fields and methods found within classes that implement the
Serializableinterface. - The below snippet will retain
publicmembers from all the classes in your codebase that implement theSerializableinterface, but only if the class is preserved:-keepclassmembers class * implements java.io.Serializable { public *; }
- keepclasseswithmembers
- This specifies the classes and the class members to be preserved if the specified class members are present.
- For example, you might prefer to retain all classes containing a
performAction()method, avoiding the need for explicit listing. - The below snippet will preserve the classes which have the
performAction()method:-keepclasseswithmembers class * { void performAction(); }
- keepnames
- This is a combination of
-keepandallowShrinking. Simply, this works the same as-keepbut also ensures that the class or member names are not changed. This is only applicable when obfuscating, else the names will not be changed anyway. - Example:
-keepnames class com.example.myapp.MyClass { *; } - Similarly, appending
namestokeepclassmembersandkeepclasseswithmemberswill simply avoid renaming to their existing functionality.
- This is a combination of
- optimizationpasses
- It specifies the number of optimization passes R8 should perform. A higher value may lead to better optimization but may increase build times. By default, a single pass is performed. If no optimizations are found after a pass, the optimization is ended.
- You might need to experiment with different values to find the right balance between size reduction and build time.
- Example:
-optimizationpasses 5
- dontoptimize
- You would use
-dontoptimizewhen you have specific reasons to disable these code optimizations. - For example, you might do this if you suspect that certain optimizations could potentially interfere with the correct behavior of your app. However, disabling optimizations should be approached cautiously because it can lead to larger APK sizes and slower app performance.
- Example:
-dontoptimize
- You would use
- dontshrink
- You would use
-dontshrinkwhen you want to explicitly prevent R8 from removing any code, even if it’s unused. - There might be a rare case where you have specific reasons for keeping all code intact, such as ensuring compatibility with other tools or libraries that expect certain classes or methods to be present.
- Example:
-dontshrink
- You would use
As an alternative to crafting complex R8 rules, a simpler way is to apply the @Keep annotation to specific classes, methods or fields. This annotation instructs R8 not to remove or rename the annotated elements.
How to configure rules while using libraries?
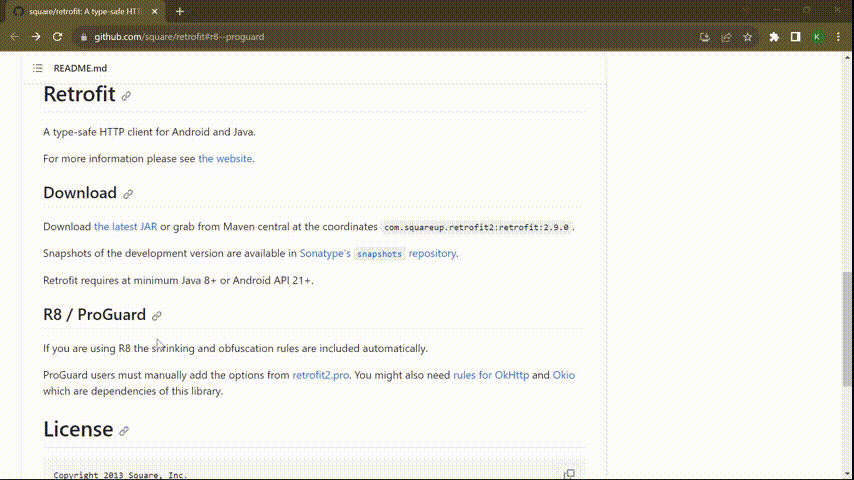
You might be using several libraries in your project such as Retrofit, Hilt, Room, etc. It’s easier to work with and add rules for your application’s code than trying to understand a library’s code and add rules for it. So, do you need to understand the code of those libraries as well to add related rules? No! Then how do you know which rules to add? Well, you can start by checking the documentation or resources provided by the library. A lot of libraries offer specific rules to help you configure R8/ProGuard for them.
R8 can automatically interpret rules for many libraries, but explicit rule definitions may be necessary for some. If your project relies on ProGuard, it is more likely that you need to add rules explicitly. Let us understand this by going through an example.
While working on one of my projects, I utilized Retrofit. Here’s how I figured out how and which R8 rules should be configured for the same. You can see that this Retrofit README.md file has a section for R8/ProGuard which has the related details. Then I used the rules mentioned in this section in my project’s “proguard-rules.pro”, and it helped me configure R8/ProGuard for the library with ease. Refer to the following gif which shows a glimpse of how to find rules required for a library and utilize them.
Similarly, you can explore other libraries’ documentation/resources to find whether you need to add rules explicitly, and if yes, which ones.
How to check which items are removed by R8?
Previously we explored how R8 can accidentally remove some in use code from your project, causing the release build to crash. To fix that, we add custom rules. Therefore, before looking into the troubleshooting process, we need to gain a comprehensive understanding of how to check which items were removed by R8.
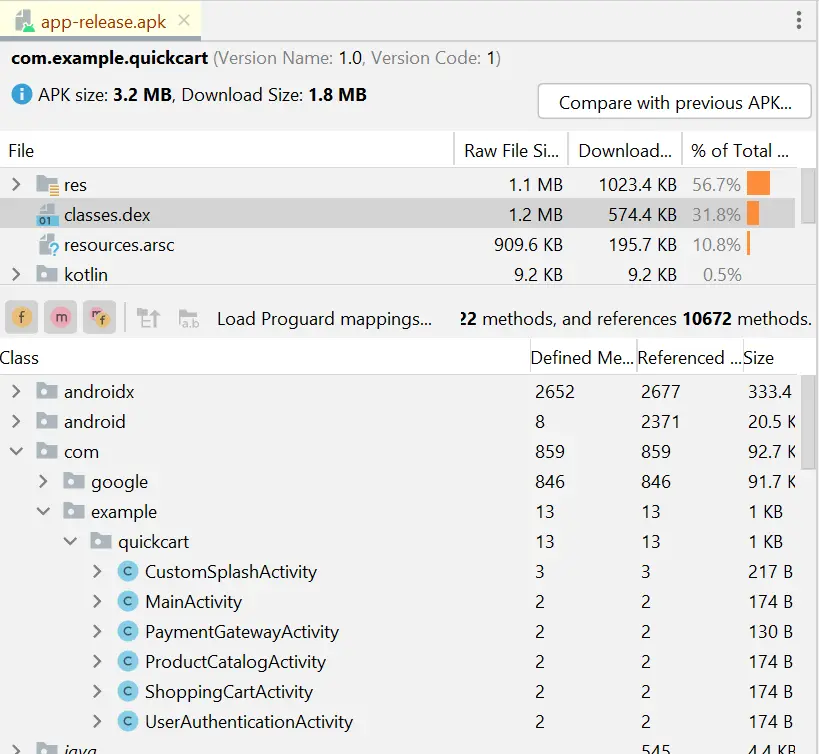
Android apps are written in Java or Kotlin, but Android devices don’t run Java directly. Instead, they use a special bytecode format called Dalvik bytecode, stored in .dex files (Dalvik Executable). These .dex files contain the code that Android devices can execute efficiently. This generated .dex file is crucial for debugging mapping issues, verification of retained code, and troubleshooting optimization problems.
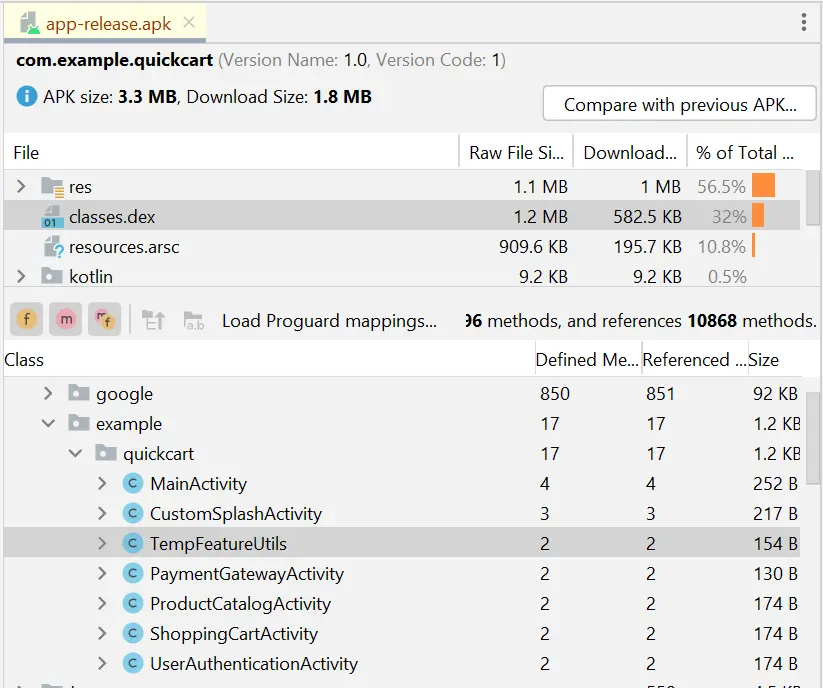
You can use the APK Analyzer in Android Studio to see which classes were removed by R8. When you build an APK/Android App Bundle with R8 enabled, extra output files are generated within the <app_module>/build/outputs/mapping/ directory. These files store data related to eliminated code and the associations between obfuscated names and their original counterparts. The process for analyzing R8 generated files is the same for when you create an APK or an Android App Bundle. You just have to open the classes.dex file in Android Studio. The dex file can be seen directly when you analyze the APK or Android App Bundle.
Now, let’s take a closer look at the various mapping files generated by R8 and understand how each of them plays a distinct role. This will help us in debugging issues related to R8.
- mapping.txt: This file is perhaps the most important among the mapping files. It contains mappings from the original names of classes, methods, and fields to their obfuscated counterparts. You can use this file extensively during debugging to trace issues related to code removal or renaming. It helps in mapping obfuscated code back to its original i.e. deobfuscated form.
- seeds.txt: The seeds file lists classes, methods, and fields that R8 has retained. You can go through these items to ensure that critical parts of the code remain intact.
- usage.txt: This file provides insights into what R8 considers as unused code and has been removed. You can review this file to identify the code which has been removed.
Let us understand this with a quick example:
You have a TempFeatureUtils class, which for some reason you do not want to be removed by R8. Let’s now explore the appearance of our generated files before and after we introduce the rule to retain TempFeatureUtils. This comparison will shed light on the changes brought about by implementing this rule.
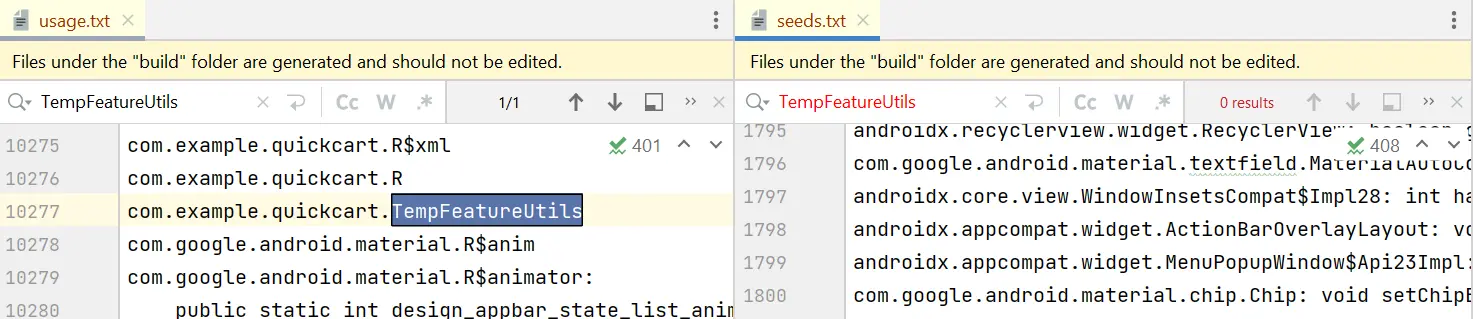
As evident from Figure 5, due to the absence of a keep rule, the class name appears in the usage file (where deleted code is displayed) rather than the seeds file (where retained code is documented).
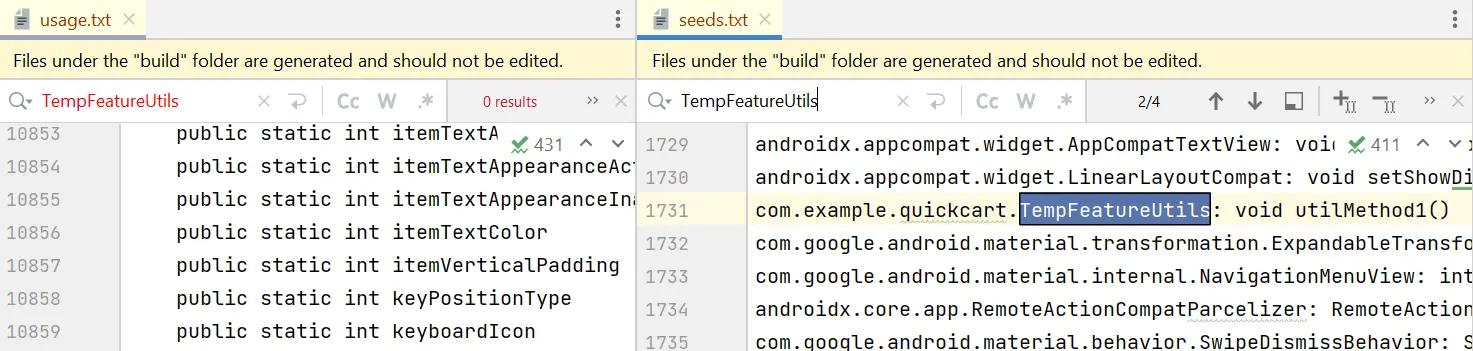
In Figure 7, you’ll notice that because we have now added a keep rule, the class, its methods, and fields are found in the seeds file rather than the usage file. This way we can identify which items are removed and which are retained.
Now that we’ve learned how to examine the files R8 creates to see what changes it made, let’s look at…
How to debug issues related to R8?
In this section, we’ll explore the steps to take when encountering a crash in a release build after enabling R8.
- Is the debug build crashing? Verify if your app faces a similar crash issue on debug build. In such a case, it most likely isn’t a R8 issue. You can also check this in the release build by setting
minifyEnabledandshrinkResourcesto false. - Is it because of shrinking? Set
minifyEnabledto true andshrinkResourcesto false. If the issue gets fixed, it might be happening due to some resource removal in the shrinking process. A simple example of this situation is when a crash occurs while attempting to view images. This issue arises because R8 inadvertently removed image resources that were used dynamically. - Is it due to obfuscation? Add the
-dontobfuscaterule to disable obfuscation by R8. If the issue isn’t reproducible anymore, the crash might be due to obfuscation. Then check themapping.txtfile and verify that the classes using reflection are not being obfuscated. If that is the case, add rules accordingly.
Now let us go through some scenarios and the debugging approach to follow:
Scenario 1
Your app starts crashing while using a particular feature after applying R8.
Debugging approach:
- Search the name of the feature specific classes, methods in the “usage” file to verify if it has been removed.
- Next, verify the “mapping” file to see if it has been obfuscated and therefore unable to find it in the code.
Scenario 2
R8 unintentionally removes code that’s accessed dynamically or via reflection.
Debugging approach:
- Employ explicit -keep rules in your configuration to specify classes and methods accessed through reflection.
- Verify code to find usages of fragment tags for fragment instantiation and consider using constructors or factory methods instead.
- Ensure that views referenced from XML layouts are retained using appropriate -keep rules.
Scenario 3
Issues/crashes due to third-party libraries.
Debugging approach:
- Check the documentation or resources provided by third-party libraries for recommended rules.
- Verify if you have added these rules to your configuration.
- Stay updated with library changes and updates to ensure your rules remain in sync with their requirements.
Scenario 4
Aggressive optimizations have been performed by R8 which are leading to unexpected app behavior.
Debugging approach:
- It might be happening due to multiple optimization passes by R8 due to the usage of
-optimizationpassesrule. - Consider temporarily disabling optimizations using
-dontoptimizein your configuration to check if optimizations are the root cause. - Gradually re-enable optimizations while meticulously testing your app to pinpoint any issues introduced.
Retrace tool
It is very difficult, if not impossible, to understand an obfuscated stack trace. This is where the Retrace tool comes into the picture. Retrace is a command-line tool that can be used to deobfuscate stack traces.
To put it in simpler terms, Retrace helps you to get the original stack trace from an obfuscated one. You can get this by downloading the command line tools package in SDK Manager.
You have to pass the mapping file and obfuscated stack trace file to the tool as follows:
retrace <path-to-mapping-file> <path-to-stack-trace-file>
Yeah, it’s that easy to use!
What is ProGuard?
ProGuard is a tool similar to R8 i.e. known to shrink and obfuscate your application. ProGuard is mainly used by Java applications. Before R8, ProGuard was the default shrinking tool in Android Studio.
ProGuard was the preferred app optimization tool before the adaptation of R8. The file generation and debugging processes are also completely identical for both tools. You can consider R8 as an upgraded iteration of ProGuard i.e. “ProGuard 2.0”. R8 is compatible with ProGuard, which means that you can use the same syntax and rules for R8 and ProGuard. R8 will handle the rest internally.
There are distinctions in the feature sets offered by ProGuard and R8. R8, being a relatively newer tool developed with a focus on Android app development, provides a more extensive range of features compared to ProGuard, let’s see a quick comparison between the two:
- ProGuard results in an 8.5% reduction in app size, whereas when compared to R8, which achieves a 10% reduction in code size.
- ProGuard has a slower processing time than R8, resulting in increased build time.
- R8 has much better Kotlin specific optimizations than ProGuard.
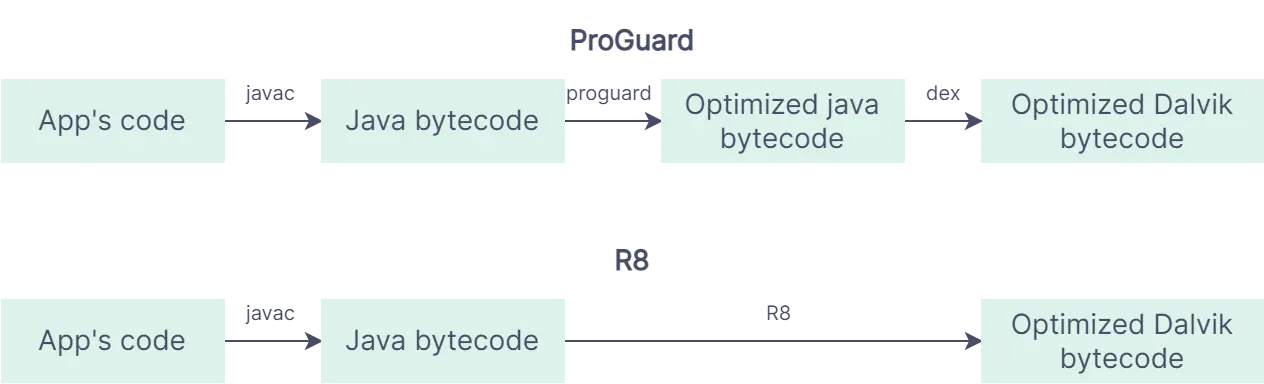
- The process of converting an app’s code into an optimized Dalvik bytecode is more efficient in R8 compared to ProGuard. Please refer to the figure below for additional information on this.
Note that ProGuard can still be used in Android projects, but if you are using Android Gradle Plugin version 7.0.0 or higher, you will need to explicitly add a plugin for it. This is because R8 is the default tool for minification and obfuscation in Android Gradle Plugin version 7.0.0 and higher. It is included as part of the Android Gradle plugin, so you can use it to optimize and shrink your apps without having to install any additional tools.
What should a dev do to use R8/ProGuard correctly, and effectively?
- Be aware of classes to keep. As we discussed above, R8/ProGuard can remove classes, methods, and fields that are not used by your app. Hence, you should have a clear understanding of which classes, methods, and fields should be preserved during the obfuscation and optimization process. This includes critical app components, libraries, and any dynamically referenced code.
- Configure rules accordingly. Once you have identified the classes and components that need to be retained, it’s time to configure rules accordingly. You can use rules like
-keep,-keepclassmembers,-keepnames,-dontwarn, etc. as per your requirement. - Handle reflection with care. Reflection can pose challenges when using tools like R8/ProGuard because it relies on dynamic class loading and method invocation. It can remove classes and members that are only accessible through reflection. However, this can sometimes cause problems with your app. To avoid this, you can:
- Avoid using fragment tags and instead use constructors or factory methods.
- Views referenced from XML layouts should be kept using
-keeprules, as they are often accessed dynamically. - Avoid reflection or configure your tool to keep such classes and members.
- Apply/configure rules for libraries used. If your app uses libraries, be sure to apply or configure rules for those libraries. Many libraries provide R8/ProGuard rules in their documentation or websites. Adding these rules ensures that the libraries function correctly after obfuscation and optimization.
- Test your app. You should always thoroughly test your application’s release build after enabling R8/ProGuard. This ensures that your app does not break after the extensive optimizations.
Conclusion
In closing, I hope this blog has equipped you with valuable insights that will help you to effectively reduce your app’s size, optimize and secure its source code.
As you navigate through R8 and ProGuard, remember that they are just a resource available with you. By carefully configuring rules, preserving essential code, and handling reflection, you can strike a balance between optimization and security.
Furthermore, if you’re still relying on ProGuard, you can try hands on with R8 as it is a more efficient version. And if you have ProGuard expertise, it is going to be rewarding as all the valuable knowledge you have about configuring ProGuard, setting up the rules, generating APKs or Android App Bundles, and even debugging issues remains similar for R8!